ARwall Setup and Settings within Unreal Engine 5 with Trackers using LiveLink
- 07 Aug 2025
- 5 Minutes to read
-
Contributors


-
Print
-
DarkLight
ARwall Setup and Settings within Unreal Engine 5 with Trackers using LiveLink
- Updated on 07 Aug 2025
- 5 Minutes to read
-
Contributors
-
Print
-
DarkLight
Article summary
Did you find this summary helpful?
Thank you for your feedback!
Section 5: ARwall Setup and Settings within Unreal Engine 5 for Tracking Solutions using LiveLink (Vive Mars)
This section describes how to set up ARwall ARFX Pro Plugin, for use with alternative tracking solutions using LiveLink (Vive Mars, Mo-Sys, Stype, etc.). This for use with UE 5.1 and above.
Section 5.1: ARwall ARFX Pro Plugin Setup for use with LiveLink/LiveLink FreeD enabled trackers.
To set up ARwall ARFX Pro Plugin to work with LiveLink/LiveLink FreeD (for use with Vive Mars, Mo-Sys, Stype, etc.), do the following:
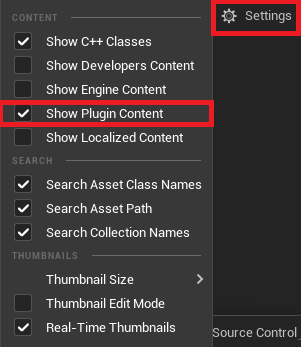
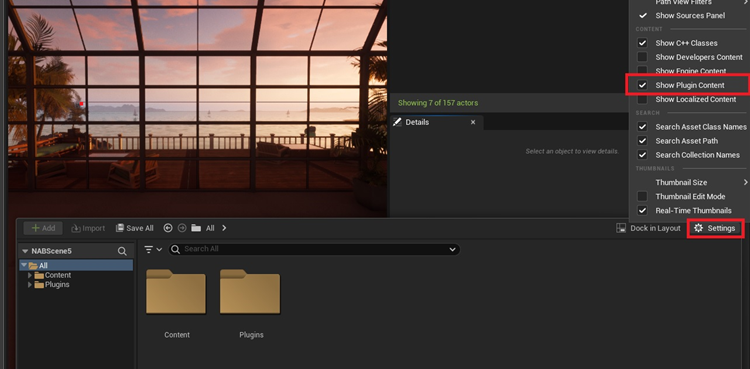
- Make sure you can see the Plugin's folder in your Content Browser:
- Open Content Drawer on the bottom left, then select Settings at the top right of Content Browser window > Turn on "Show Plugin Content
- Note: FreeD is an alternative tracking protocol typically used by some camera crane tracking solutions. It can also be used to send tracking data to a remote server on the internet.
- Make sure the following Required Plugins are turned on in Unreal Engine under Plugins:
- ARwall
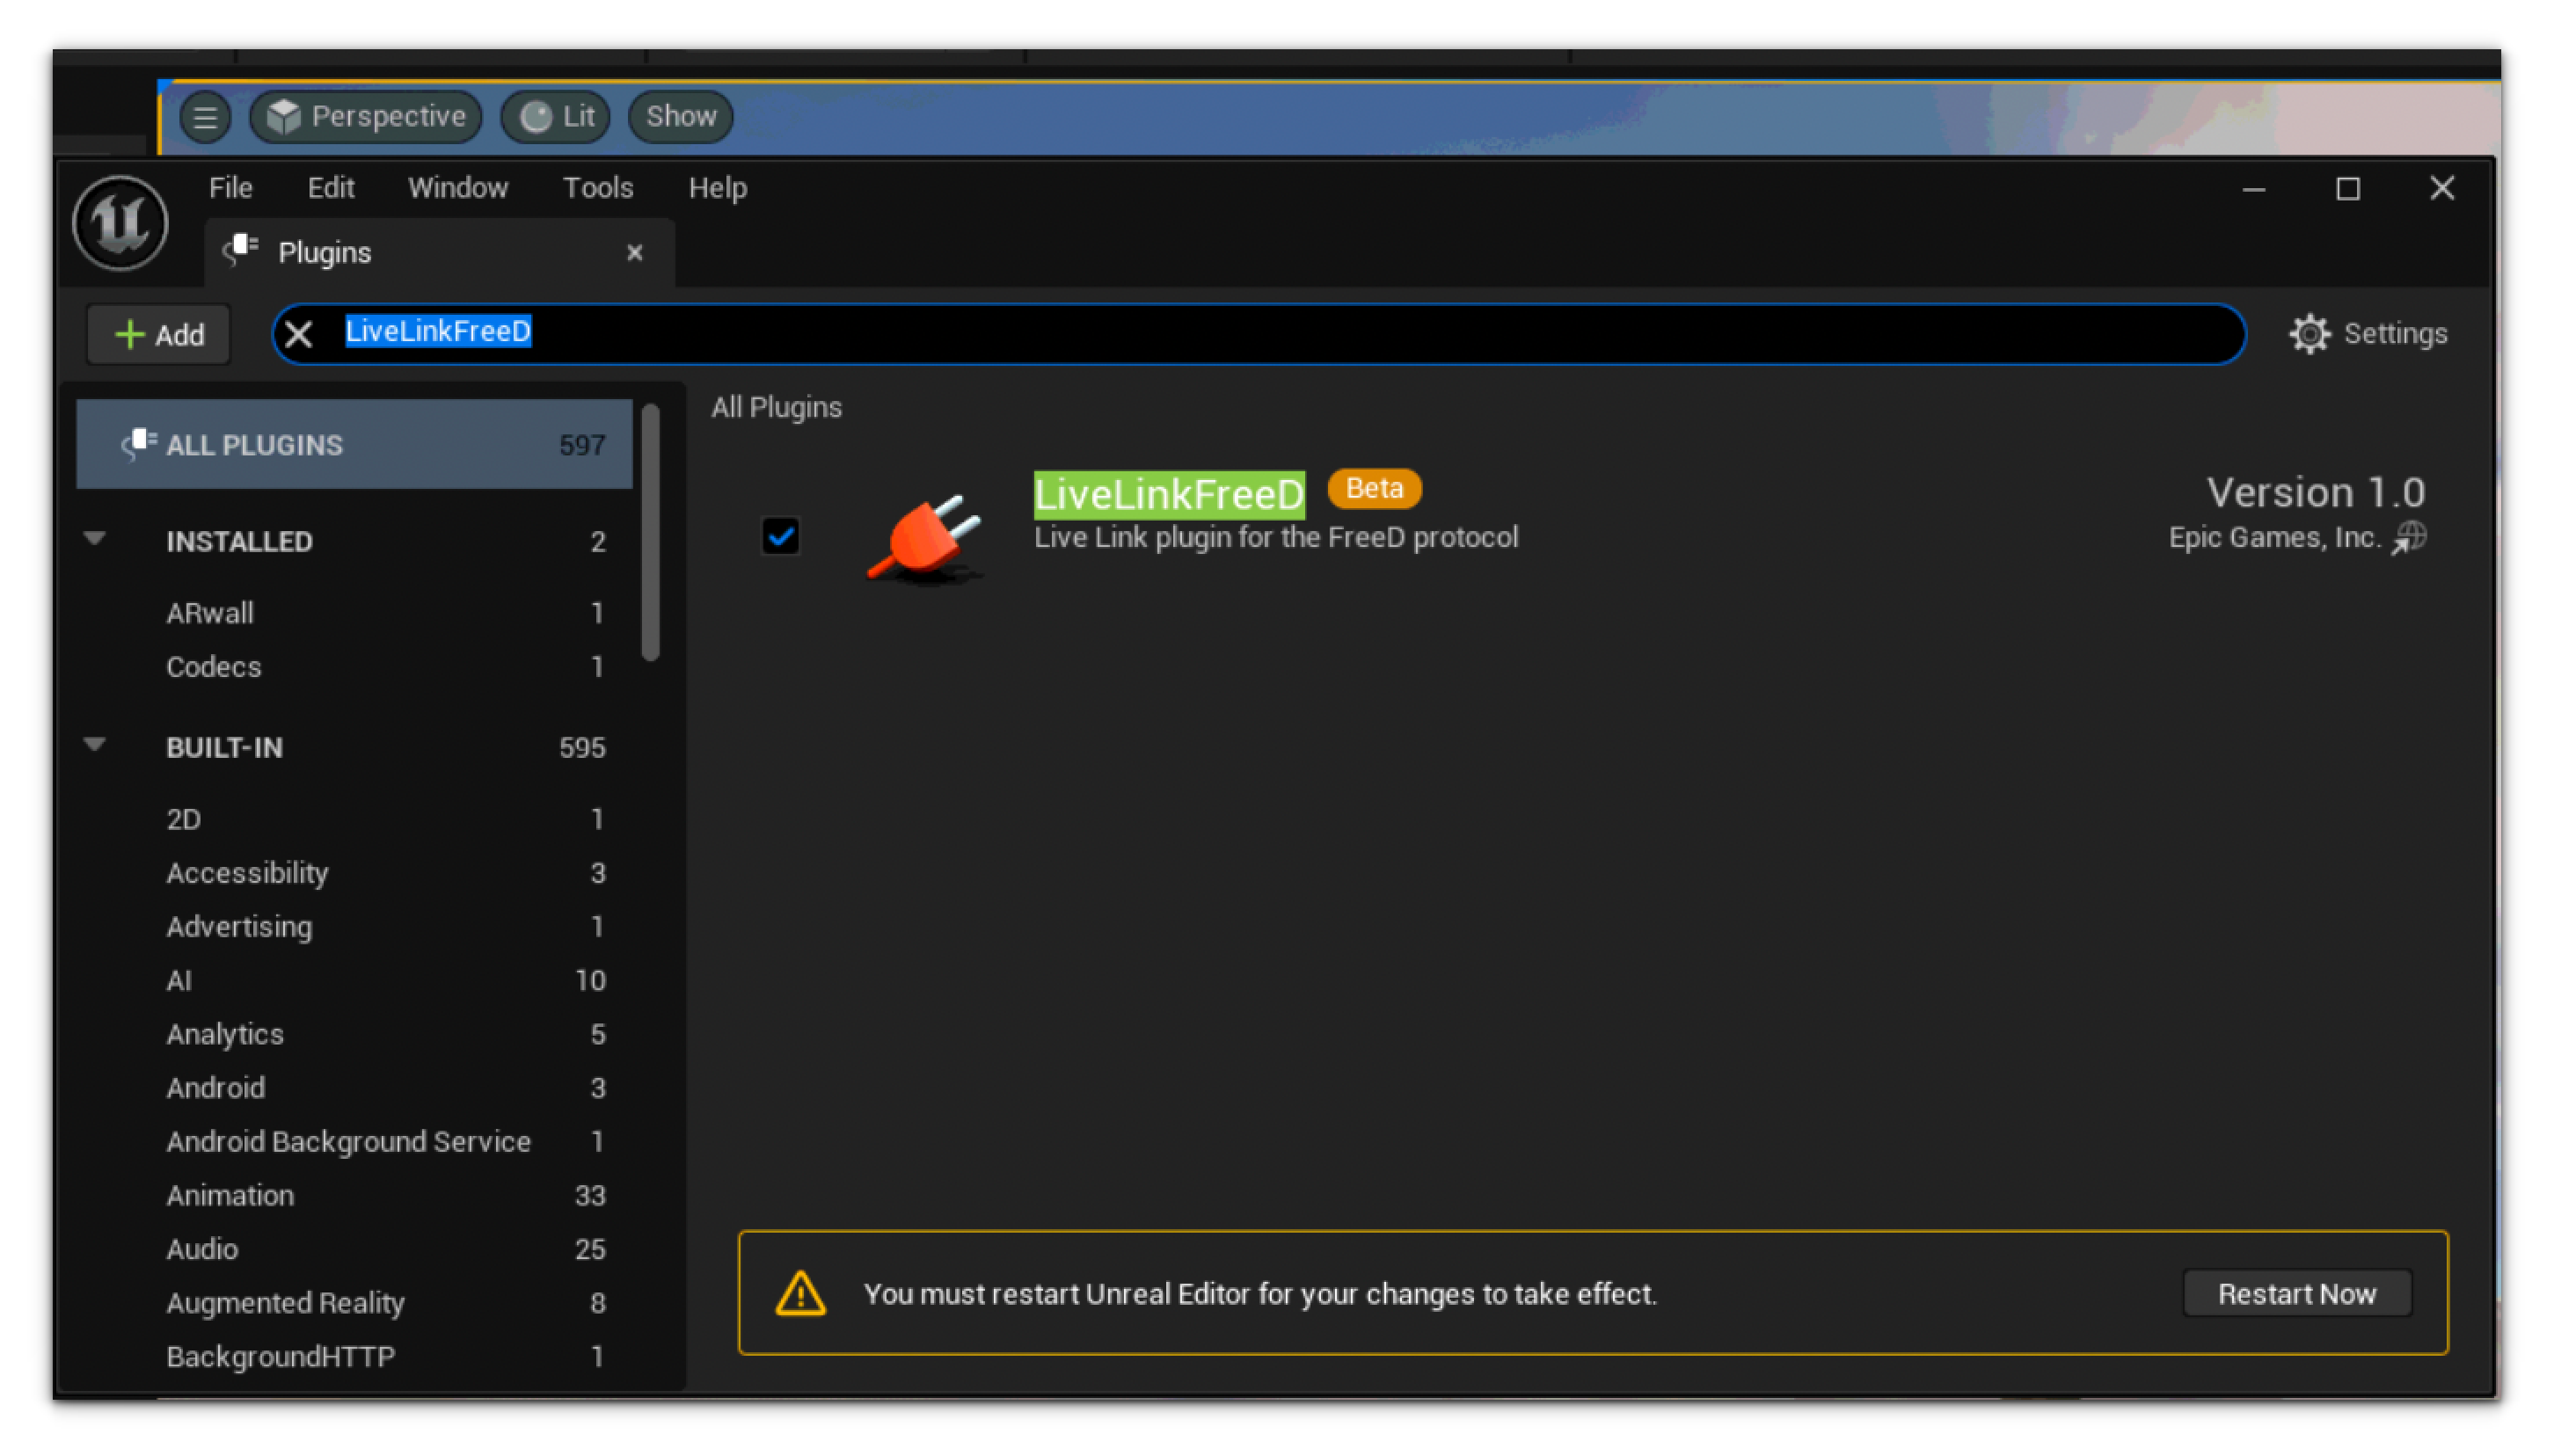
- Live Link
- LiveLinkFreeD (optional)
- ARwall
- Open Content Drawer on the bottom left, then select Settings at the top right of Content Browser window > Turn on "Show Plugin Content
- Setting Up Live Link
- Important: Make sure your hardware tracking device is physically connected, on, and tracking.
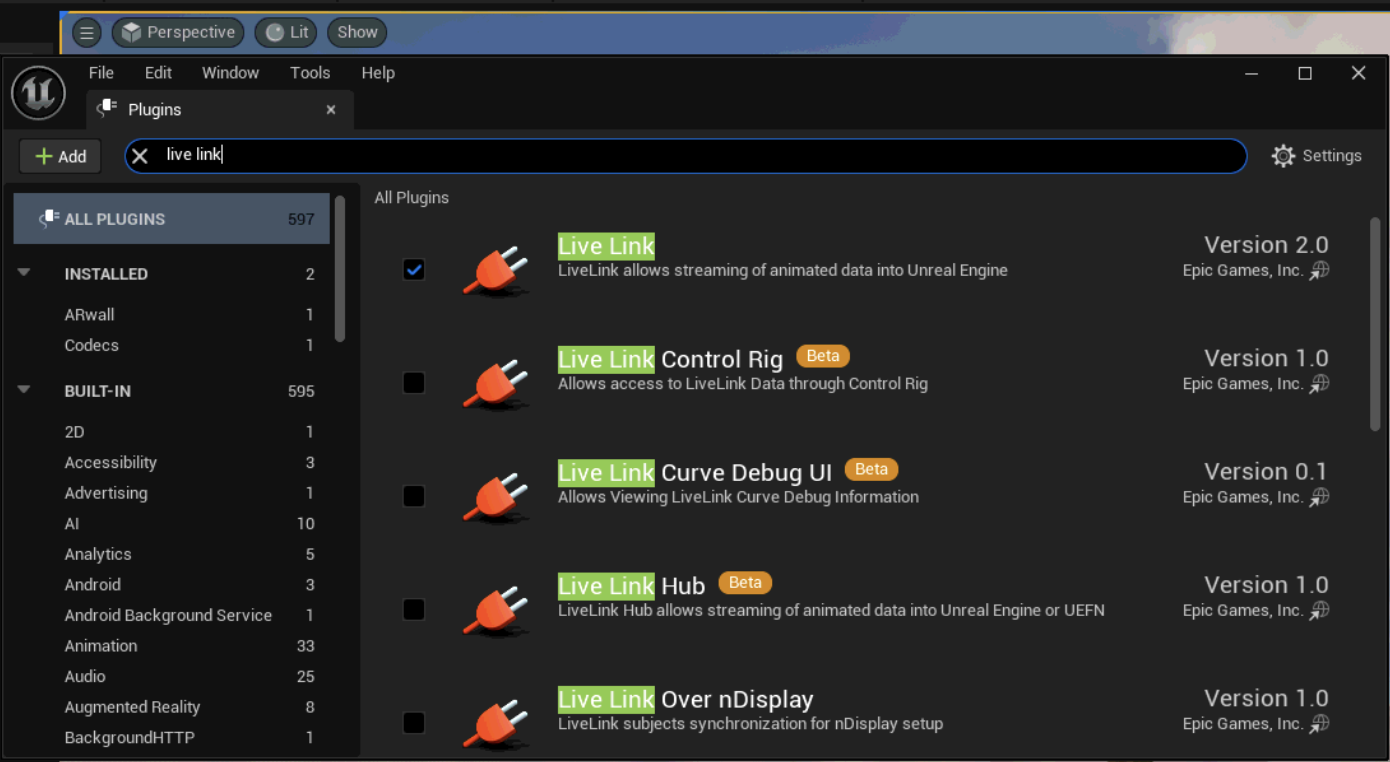
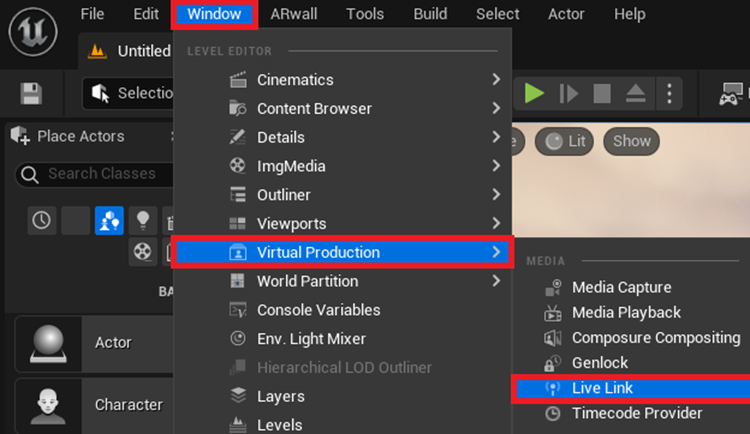
- In Unreal Engine, select Window > Virtual Production > Live Link.
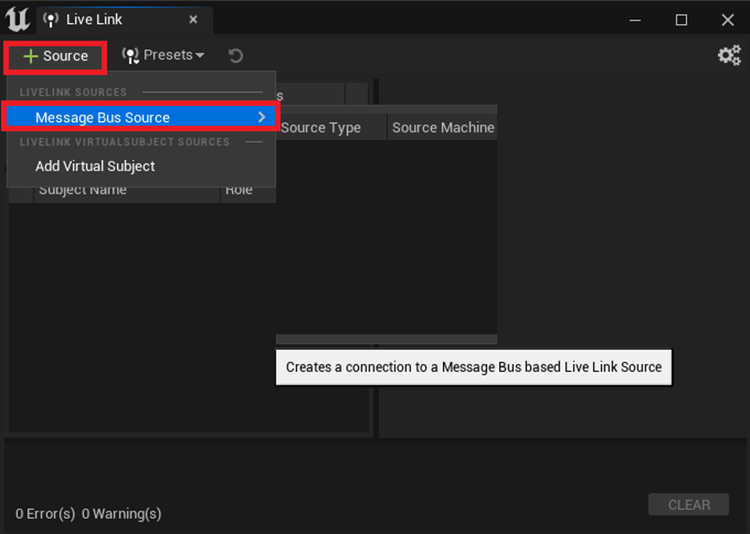
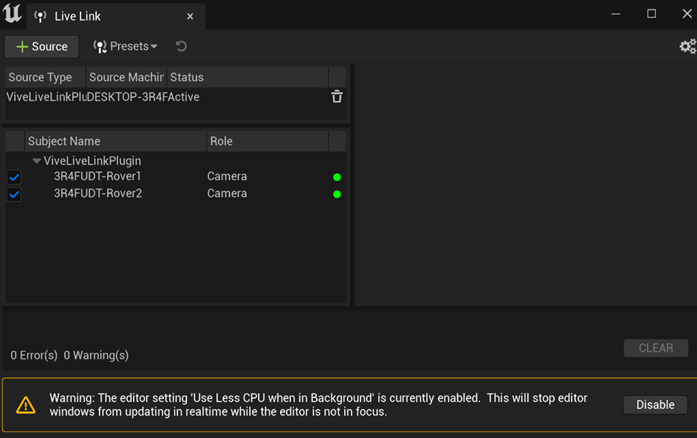
- In the Live Link Window, click on "+ Source" and navigate to Message Bus Source. Wait for the connected source to show and select it (ie. "ViveLiveLinkPlugin").
- If no source appears, check your tracking devices' connection to the network and make sure it is actually tracking.
- Be sure the server and the Vive Mars box are both connected to the same switch
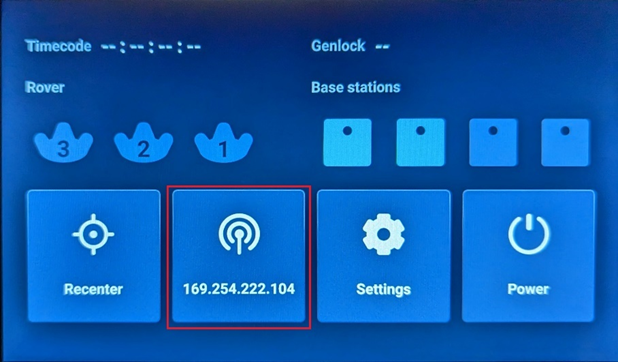
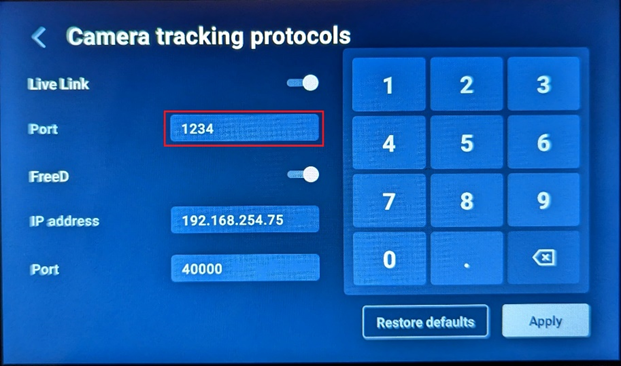
- On Vive Mars box, note the network IP number that is listed on the Vive Mars screen
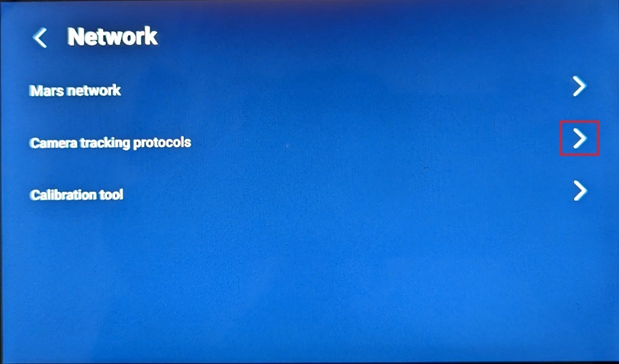
- On Vive Mars box, tap the network box where the network IP address is listed, then tap Camera Tracking Protocols and note the Live Link Port number
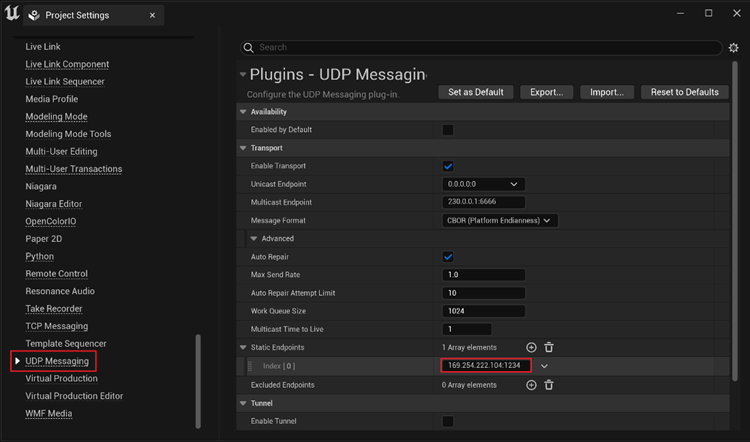
- In Unreal Engine, navigate to Edit > Project Settings and on the left, scroll down to Plugins and select UDP Messaging. Navigate to Static Endpoints and under Index [0] enter the network number listed on the Vive Mars screen and add “:” and add the port number after the colon. If no Index [0] exists, click on the “Add Element” button to add an array element.
- If no source appears, check your tracking devices' connection to the network and make sure it is actually tracking.
- You should now see your trackers with green indicators (yellow = might be delayed, red = packet loss).
Section 5A.2: Setting Up Live Link FreeD
- Make sure your hardware device is on and tracking.
- Make sure you've set the target computer's IP Address (local or global) and a unique port number (default:40000).
- In Unreal Engine, navigate to Window > Virtual Production > LiveLinkFreeD Source > Set IP Address to your computers local/global IP Address and make sure the port number match's device's (default: 40000) > Add.
- You should see that FreeD is receiving and has a subject or two under FreeD with green indicators (yellow = might be delayed, red = packet loss).
- If no subjects appear, make sure the IP address and port matches the tracking devices and make sure the tracking device is actually tracking.
Section 5A.3: Setting Up the ARwall Camera with a Single Vive Mars Tracker
- In Content Drawer, locate Plugins > ARwall Content > Blueprints.

- If Plugins folder does not show up, click Settings option in the Content Drawer and click on “Show Plugin Content”
- If Plugins folder does not show up, click Settings option in the Content Drawer and click on “Show Plugin Content”
- Drag and drop BP_ARwallCamera_LiveLink onto your scene viewport (do not worry about positioning it yet).

- Make sure the placed camera is selected and visible in your Outliner window.
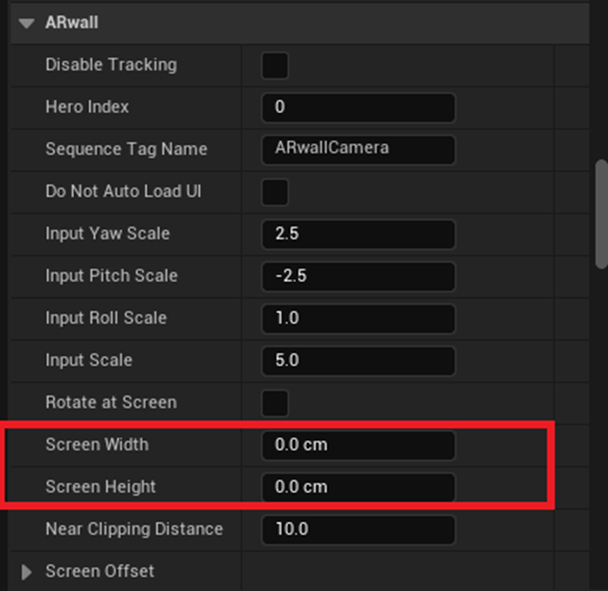
- In the Detail Panel, navigate to the ARwall section and set the camera's "Screen Height" and "Screen Width" to your physical screen's height and width in centimeters.
- In the Detail Panel, navigate to ARwall Custom > Modifiers and make sure Flip Z and XYZ to ZYX are checked.

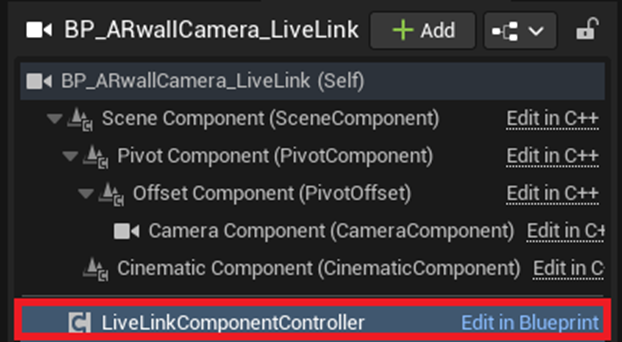
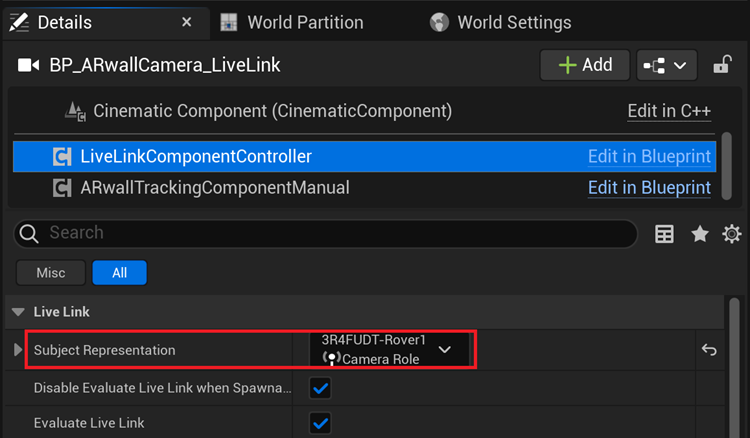
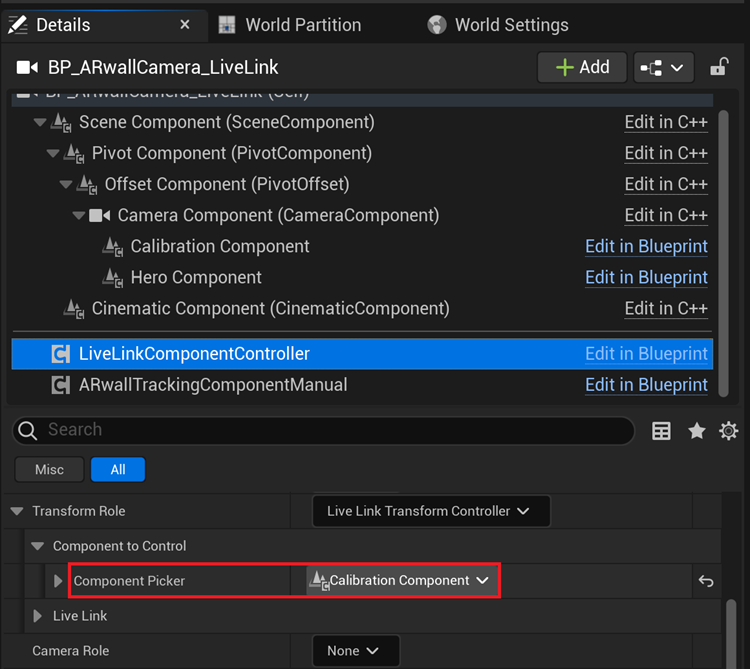
- Select the LiveLinkComponentController within the BP_ARwallCamera_LiveLink camera's components.
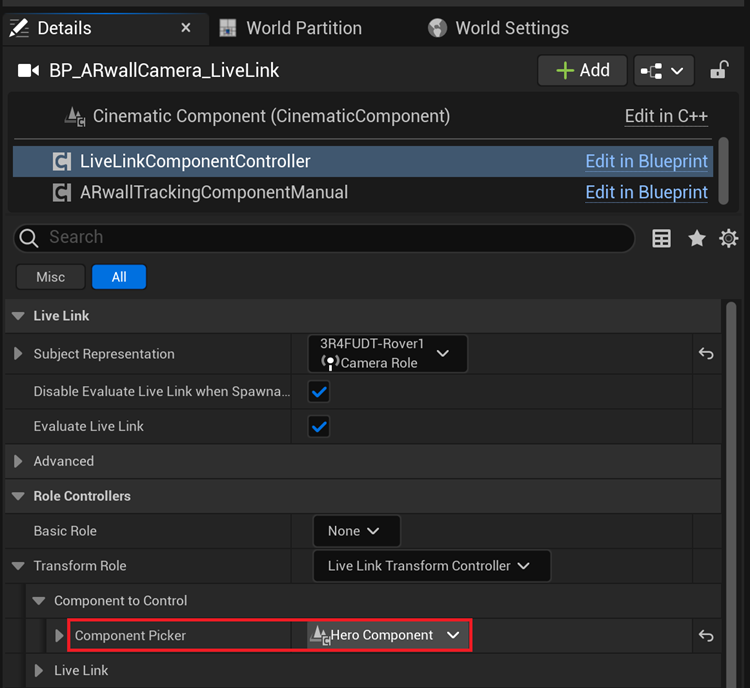
- In the details panel, navigate to Live Link > Subject Representation and set this to the tracker that was populated as described by the Setting Up Live Link section above.
- NOTE: You will more than likely see your camera move in the scene as its position is now controlled by the tracker.

- NOTE: You will more than likely see your camera move in the scene as its position is now controlled by the tracker.
- Navigate to Role Controllers > Transform Role > Component to Control > Component Picker and change the selection drop down to "Hero Component"
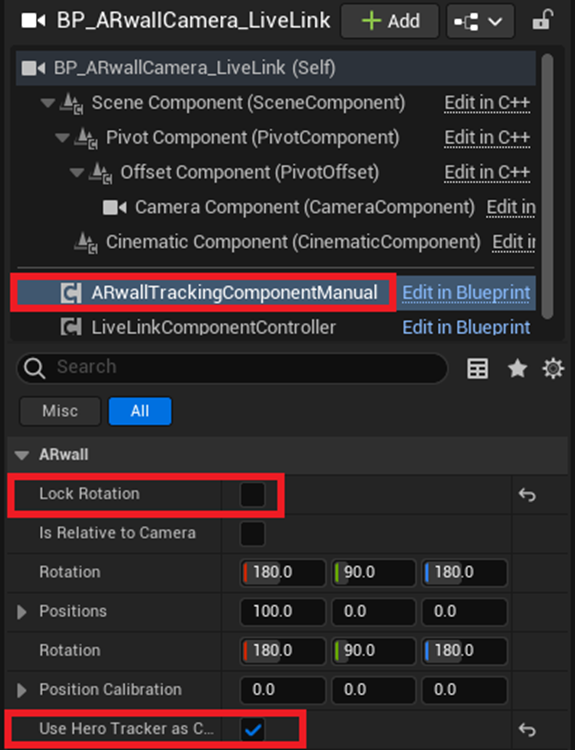
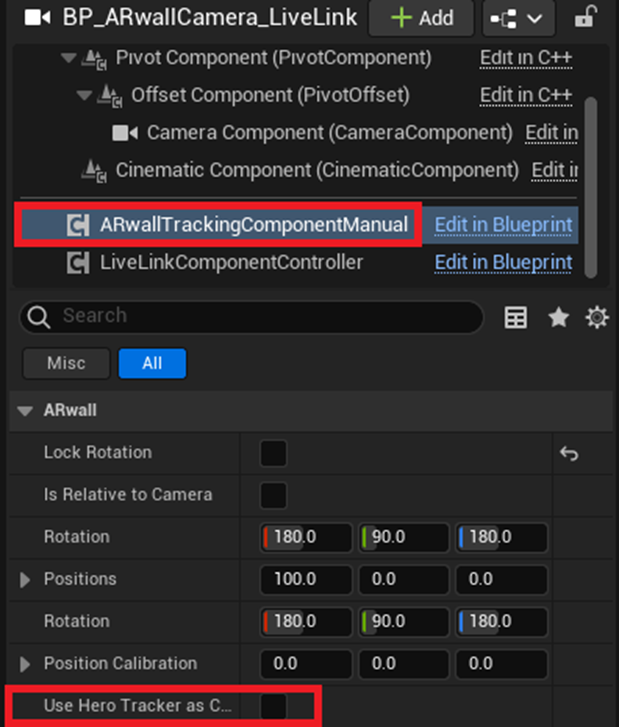
- Select ARwallTrackingComponentManual within the BP_ARwallCamera_LiveLink camera's components.
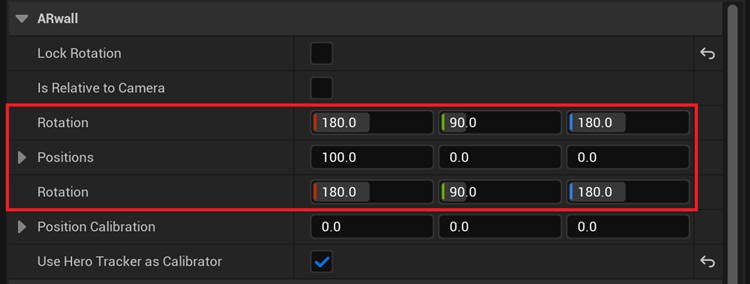
- Navigate to the ARwall section and make sure "Lock Rotation" is off and "Use Hero Tracker as Calibrator" is on.
- Note: If you select the Hero Component in the camera's component list, you should see its position and rotation update in Realtime to your tracker's movements.

- Navigate to the ARwall section and make sure "Lock Rotation" is off and "Use Hero Tracker as Calibrator" is on.
- Move the camera's position in the scene viewport to where you want (its position and rotation should no longer be tied to the tracker's)
- This will be the scene’s virtual start location when the scene is played
- Press Play and try moving the tracker, the tracker should be tracking and the perspective should change with the tracker’s movements.
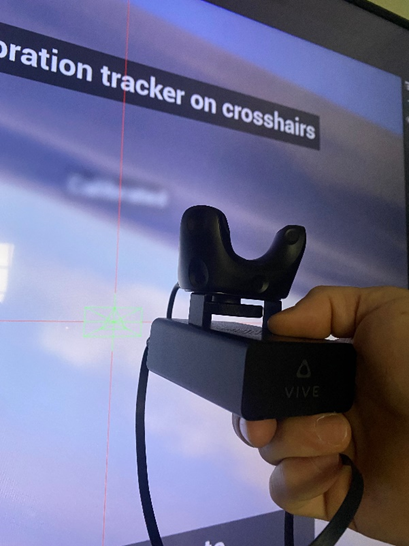
- Calibrate as you would with a Vive Pro Tracker, but do know that you may need to orientate the tracker a few times until the screen moves properly.
- Vive Mars Calibration: Hold it face up with the wires pointing towards the screen.
Section 5A.4: Setting Up the ARwall Camera with Two Vive Mars Trackers (Hero + Calibration)
The setup is the same for both normal LiveLink and FreeD. Follow these additional steps:
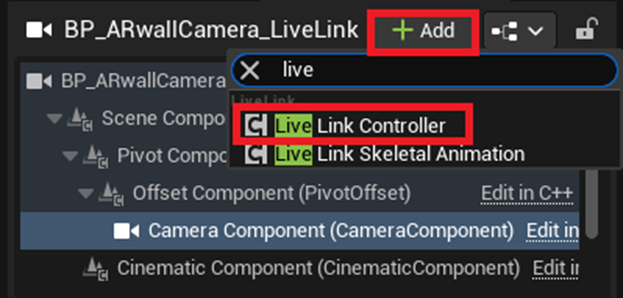
- With the Camera selected, click on "+ Add" button and select LiveLinkController
- Optional: Rename the second controller to something unique (ex: "LiveLinkCalibration")
- In the details panel, navigate to Live Link > Subject Representation and set this to the second tracker that was populated as described by the Setting up Live Link section above.
- NOTE: You will more than likely see your camera move in the scene as its position is now controlled by the second tracker.
- NOTE: You will more than likely see your camera move in the scene as its position is now controlled by the second tracker.
- Navigate to Role Controllers > Transform Role > Component to Control > Component Picker and change the selection drop down to "Calibration Component"
- Select ARwallTrackingComponentManual within the BP_ARwallCamera_LiveLink camera's components.
- Turn off "Use Hero Tracker as Calibrator"
- Note: If you select the Calibration Component in the camera's component list, you should see its position and rotation update in Realtime to your second/calibration tracker's movements and not your first/hero tracker’s movements.
- Turn off "Use Hero Tracker as Calibrator"
- Reposition your BP_ARwallCamera_LiveLink camera as needed in the viewport.
- This will be the scene’s virtual start location when the scene is played
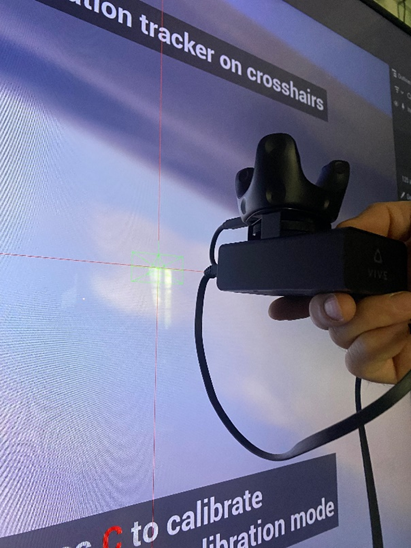
- Press play to start the scene, and press Tab button to toggle on calibration mode.
- Place the physical second/calibration tracker in the middle of the physical screen and calibrate with your second tracker.
- Press TAB button to toggle off calibration mode when done calibrating.
- Note: Moving the first/hero tracker should change the perspective and parallax independent of the calibration tracker movements.
Was this article helpful?