Calibration and Virtual Camera Control
- 07 Aug 2025
- 10 Minutes to read
- Contributors


- Print
- DarkLight
Calibration and Virtual Camera Control
- Updated on 07 Aug 2025
- 10 Minutes to read
- Contributors
- Print
- DarkLight
Article summary
Did you find this summary helpful?
Thank you for your feedback!
Section 17. Calibration and Virtual Camera Control
This section describes how to calibrate ARwall ARFX using the patented XR Sync system and describes how to use the ARwall camera controls once ARFX is up and running.
Section 17.1 XR Sync Calibration
This section describes how to calibrate the ARwall ARFX Plugin using the patented XR Sync system. This process is the same whether running ARFX through the ARFX Launcher, Unreal Engine 5.3, or 5.4.
Once the ARwall ARFX scene is up and running, calibrate the scene so that the proportions and parallax look correct to the tracked physical camera. To perform calibration in ARwall ARFX, do the following:
- Press the TAB key on a keyboard or the X button on an Xbox controller; the calibration screen will open. Locate the center of the screen marked by the red crosshairs.
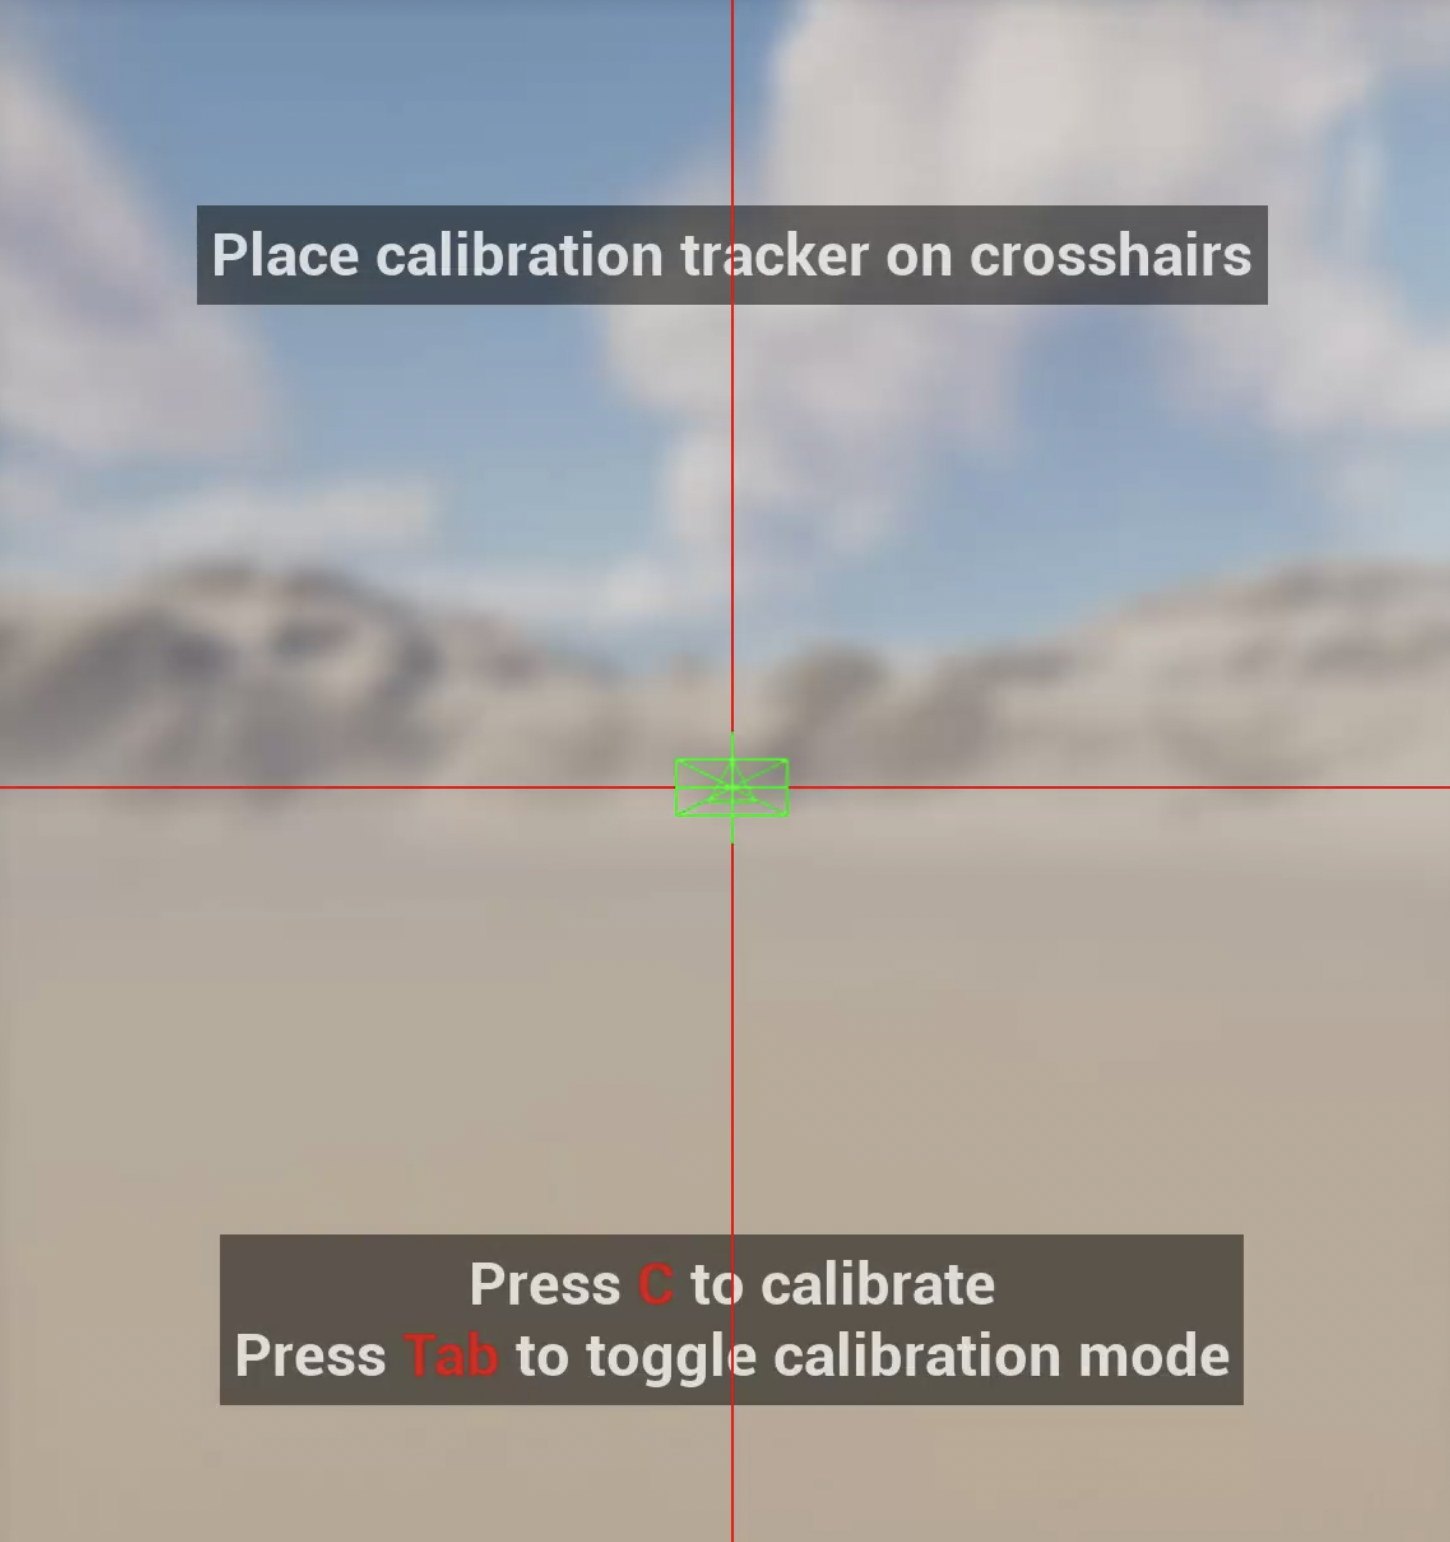
- The green triangle/square that appears represents the calibration tracker. The current position is always relative to the last calibration point but should always move in relationship to wherever you move the calibration puck.ImportantThe green triangle/square should move when moving one of the trackers connected to the system. This is the tracker previously set as the calibration tracker. If this is not the intended tracker for calibration, either swap the tracker's physical positions (on the camera vs next to the screen) or swap the serial numbers. Further information on how to obtain the serial numbers can be found here: Section 3.6 Identify and Label Vive Tracker Serial Numbers via USBDeview
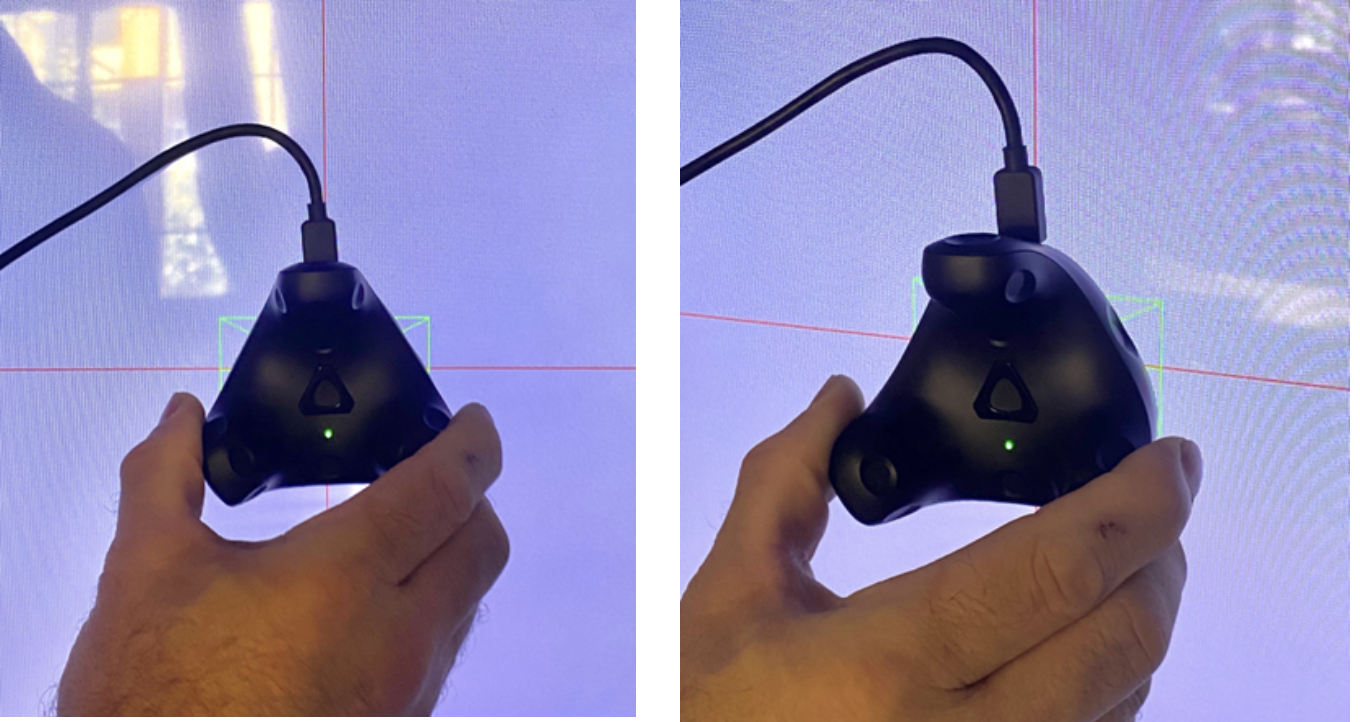
- Place the calibration puck flat against the screen and centered on the crosshairs with the green light on the tracker facing up (for 2.0 Trackers) and with the green light on the tracker facing down (for 3.0 Trackers). Both 2.0 and 3.0 Trackers will have the cable pointed up for correct calibration.
Press the Calibration button (that was set previously under Hotkeys; by default, it should be the C key on the keyboard and the B button on the Xbox controller) while the calibration puck is on the crosshairs, then press TAB (or whichever button was previously set under Hotkeys) to exit the calibration screen.
2.0 Trackers
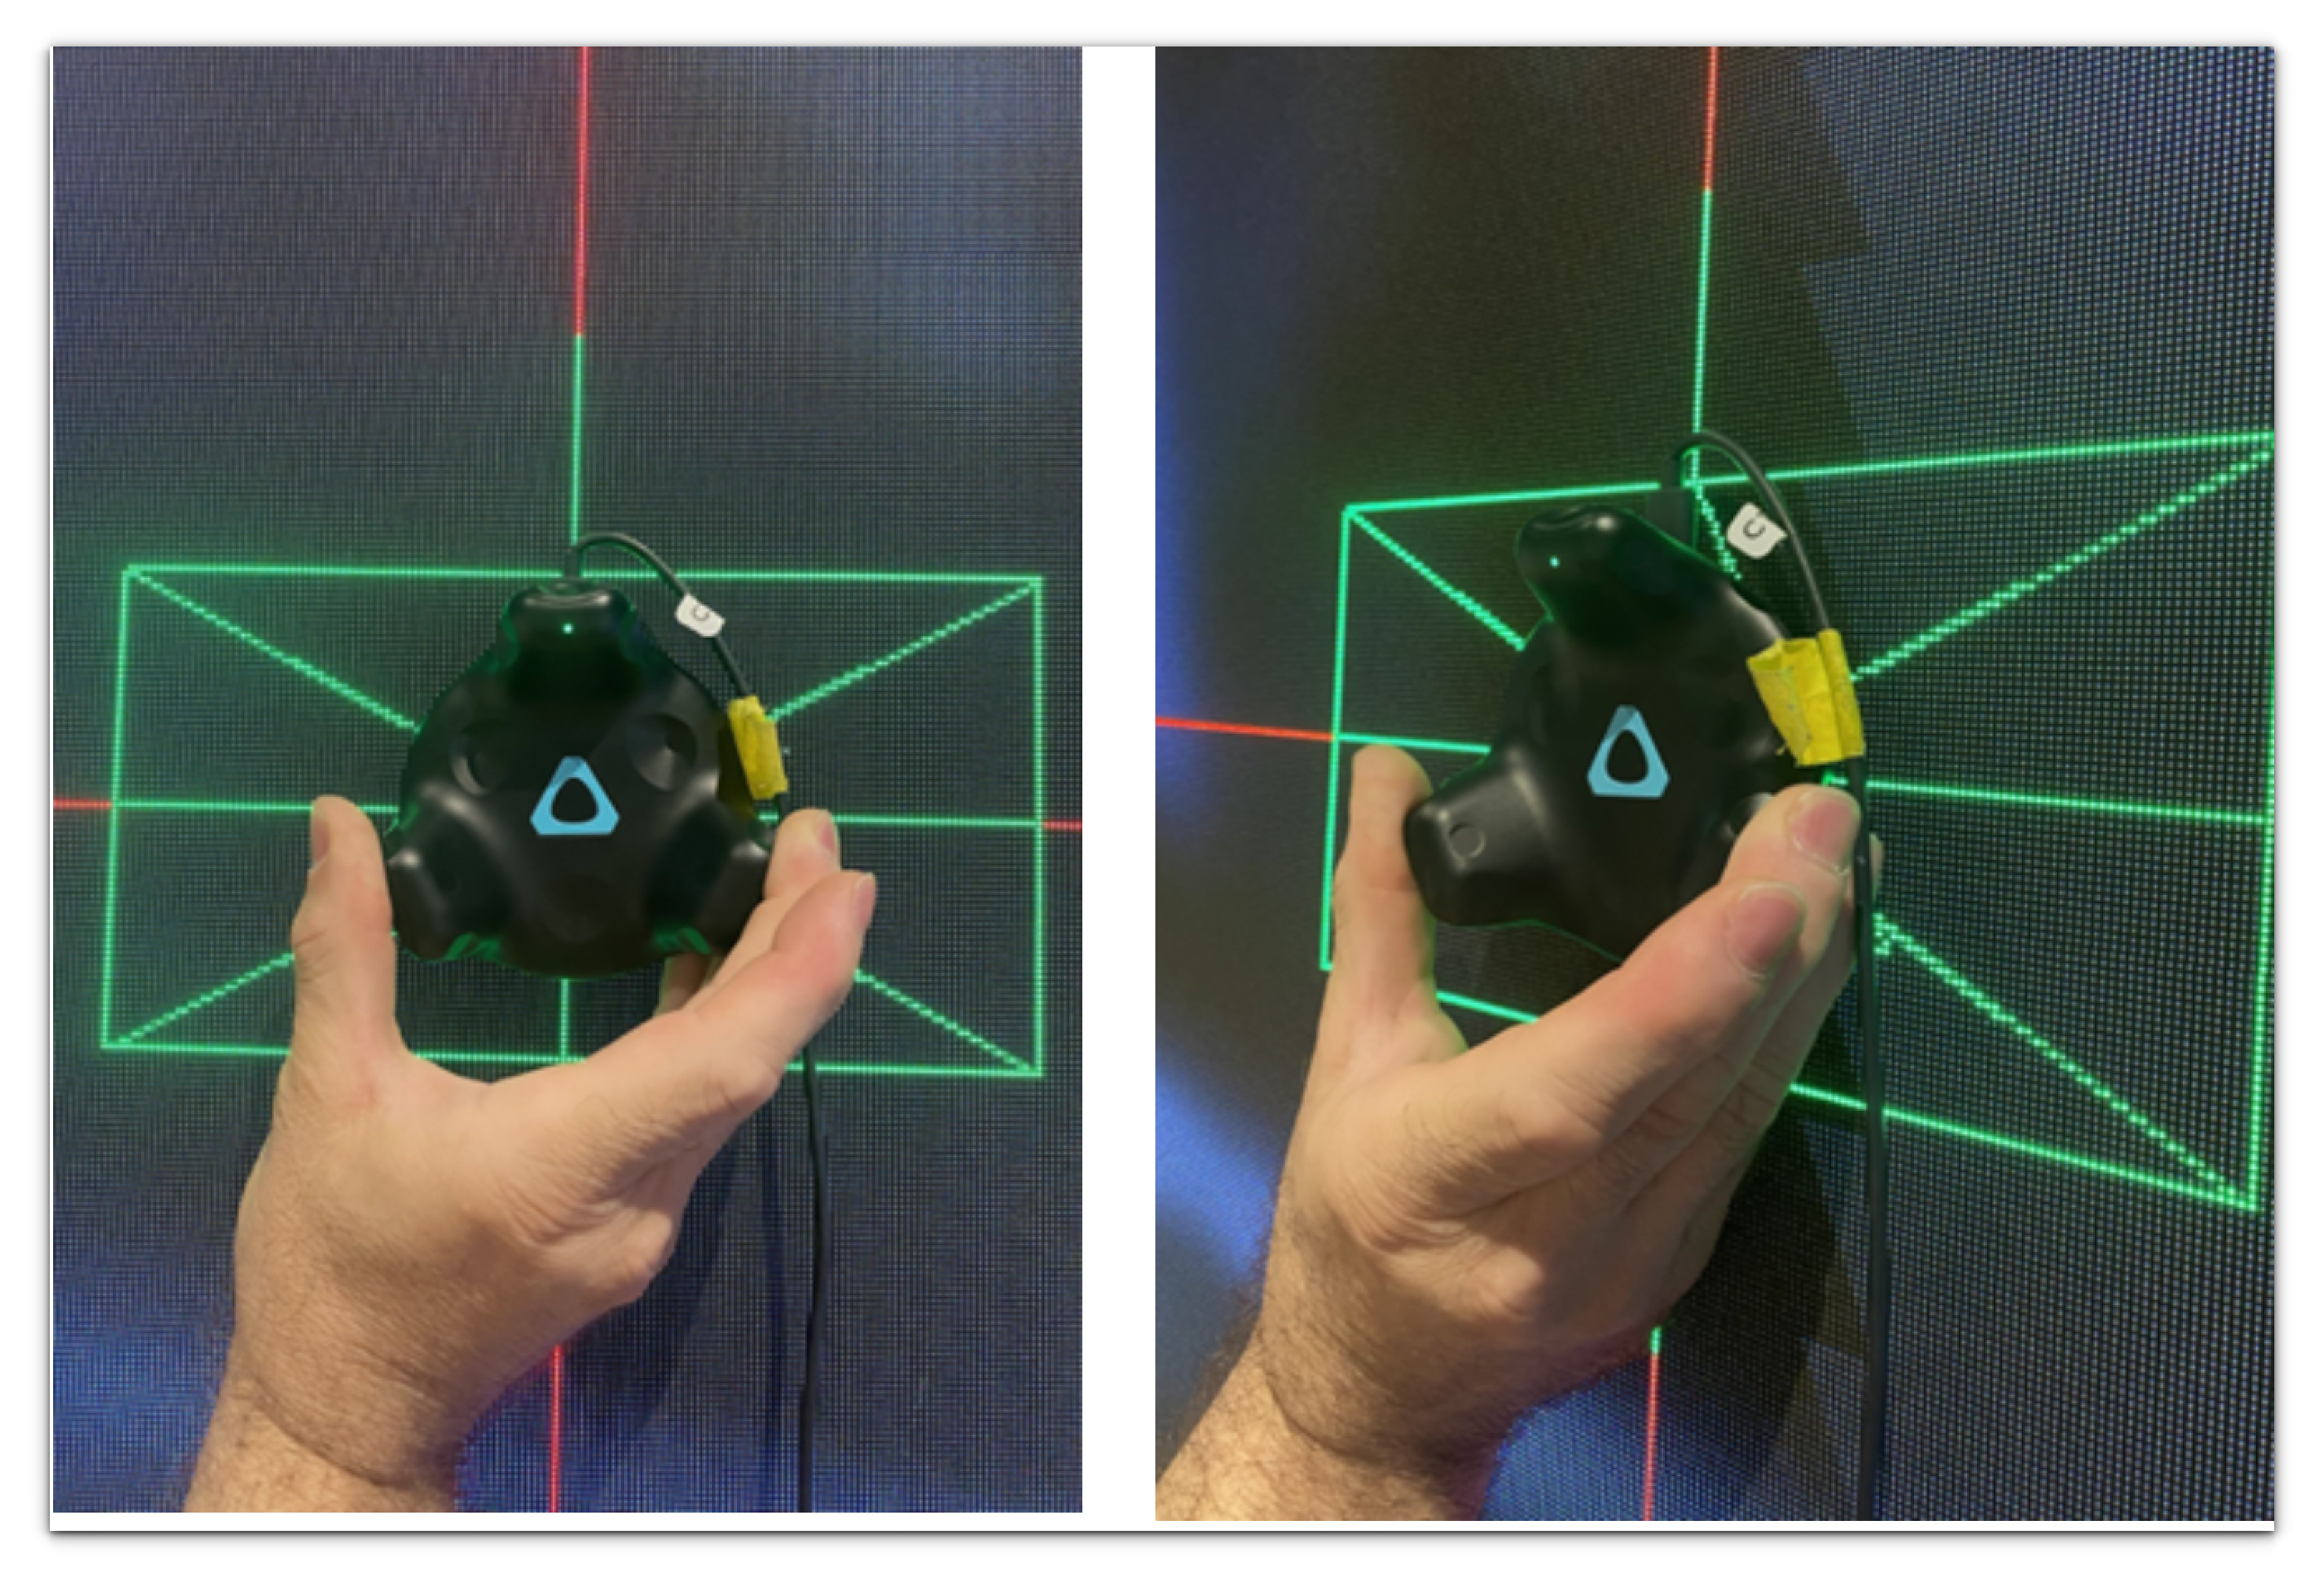
3.0 Trackers
Important
Feel free to press the Calibration button again if it does not look like it calibrated correctly the first time. Make sure the calibration tracker is positioned in place on the red crosshairs until it looks like the ARFX Screen looks correctly positioned and does not jump around a lot between calibration button presses. This ensures that you have the most optimal calibration.
Important
It is good practice to recalibrate anytime a lighthouse is moved or bumped, even if it is very minute. This could cause jitter/jumping of the virtual camera if not recalibrated.
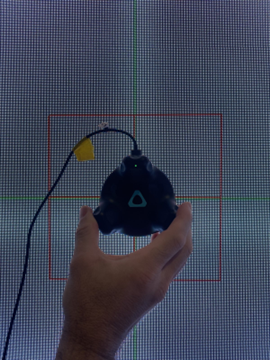
If calibrating for a multiscreen version of the ARFX Pro Plugin, the crosshairs will be green (instead of red), and the box representing the calibration puck will be a red box with a plus sign in the middle. Otherwise, calibration should be the same for multiscreen.
Section 17.2 Calibration Puck Tracker Offset Setup
If, for any reason, the calibration puck cannot be physically placed on the center of the screen during the calibration process, it’s possible to add an offset for calibration so that the calibration puck can be placed somewhere more accessible. The Screen Offset function allows you to change the settings inside Unreal Engine 5.3 or 5.4 to match the physical distance where the center of the physical screen is and where the calibration puck may need to be on set.
Important
During calibration mode, the bottom of the calibration tracker needs to be pointed at the screen and placed flat vertically on the center of the screen where the red crosshairs show. When using an offset location for the calibration puck, make sure to keep the bottom of the tracker still pointing towards the physical screen. This may require a ¼ inch screw setup that keeps the puck in that same 90-degree rotation.
Set up calibration tracker offset to match in Unreal Engine.
- Match the virtual ARwall Camera Actor offset to match the physical camera hero tracker offset.
- Measure the vertical (up/down, Z-axis), depth (forward/backward, X-axis), and side-to-side (left/right, y-axis distance in centimeters from the center of the red crosshairs from the screen while in calibration mode to the bottom/center of the physical Vive calibration tracker.
Important.
It is recommended that you place your offset calibration tracker in a precise, still, and unmoving position.
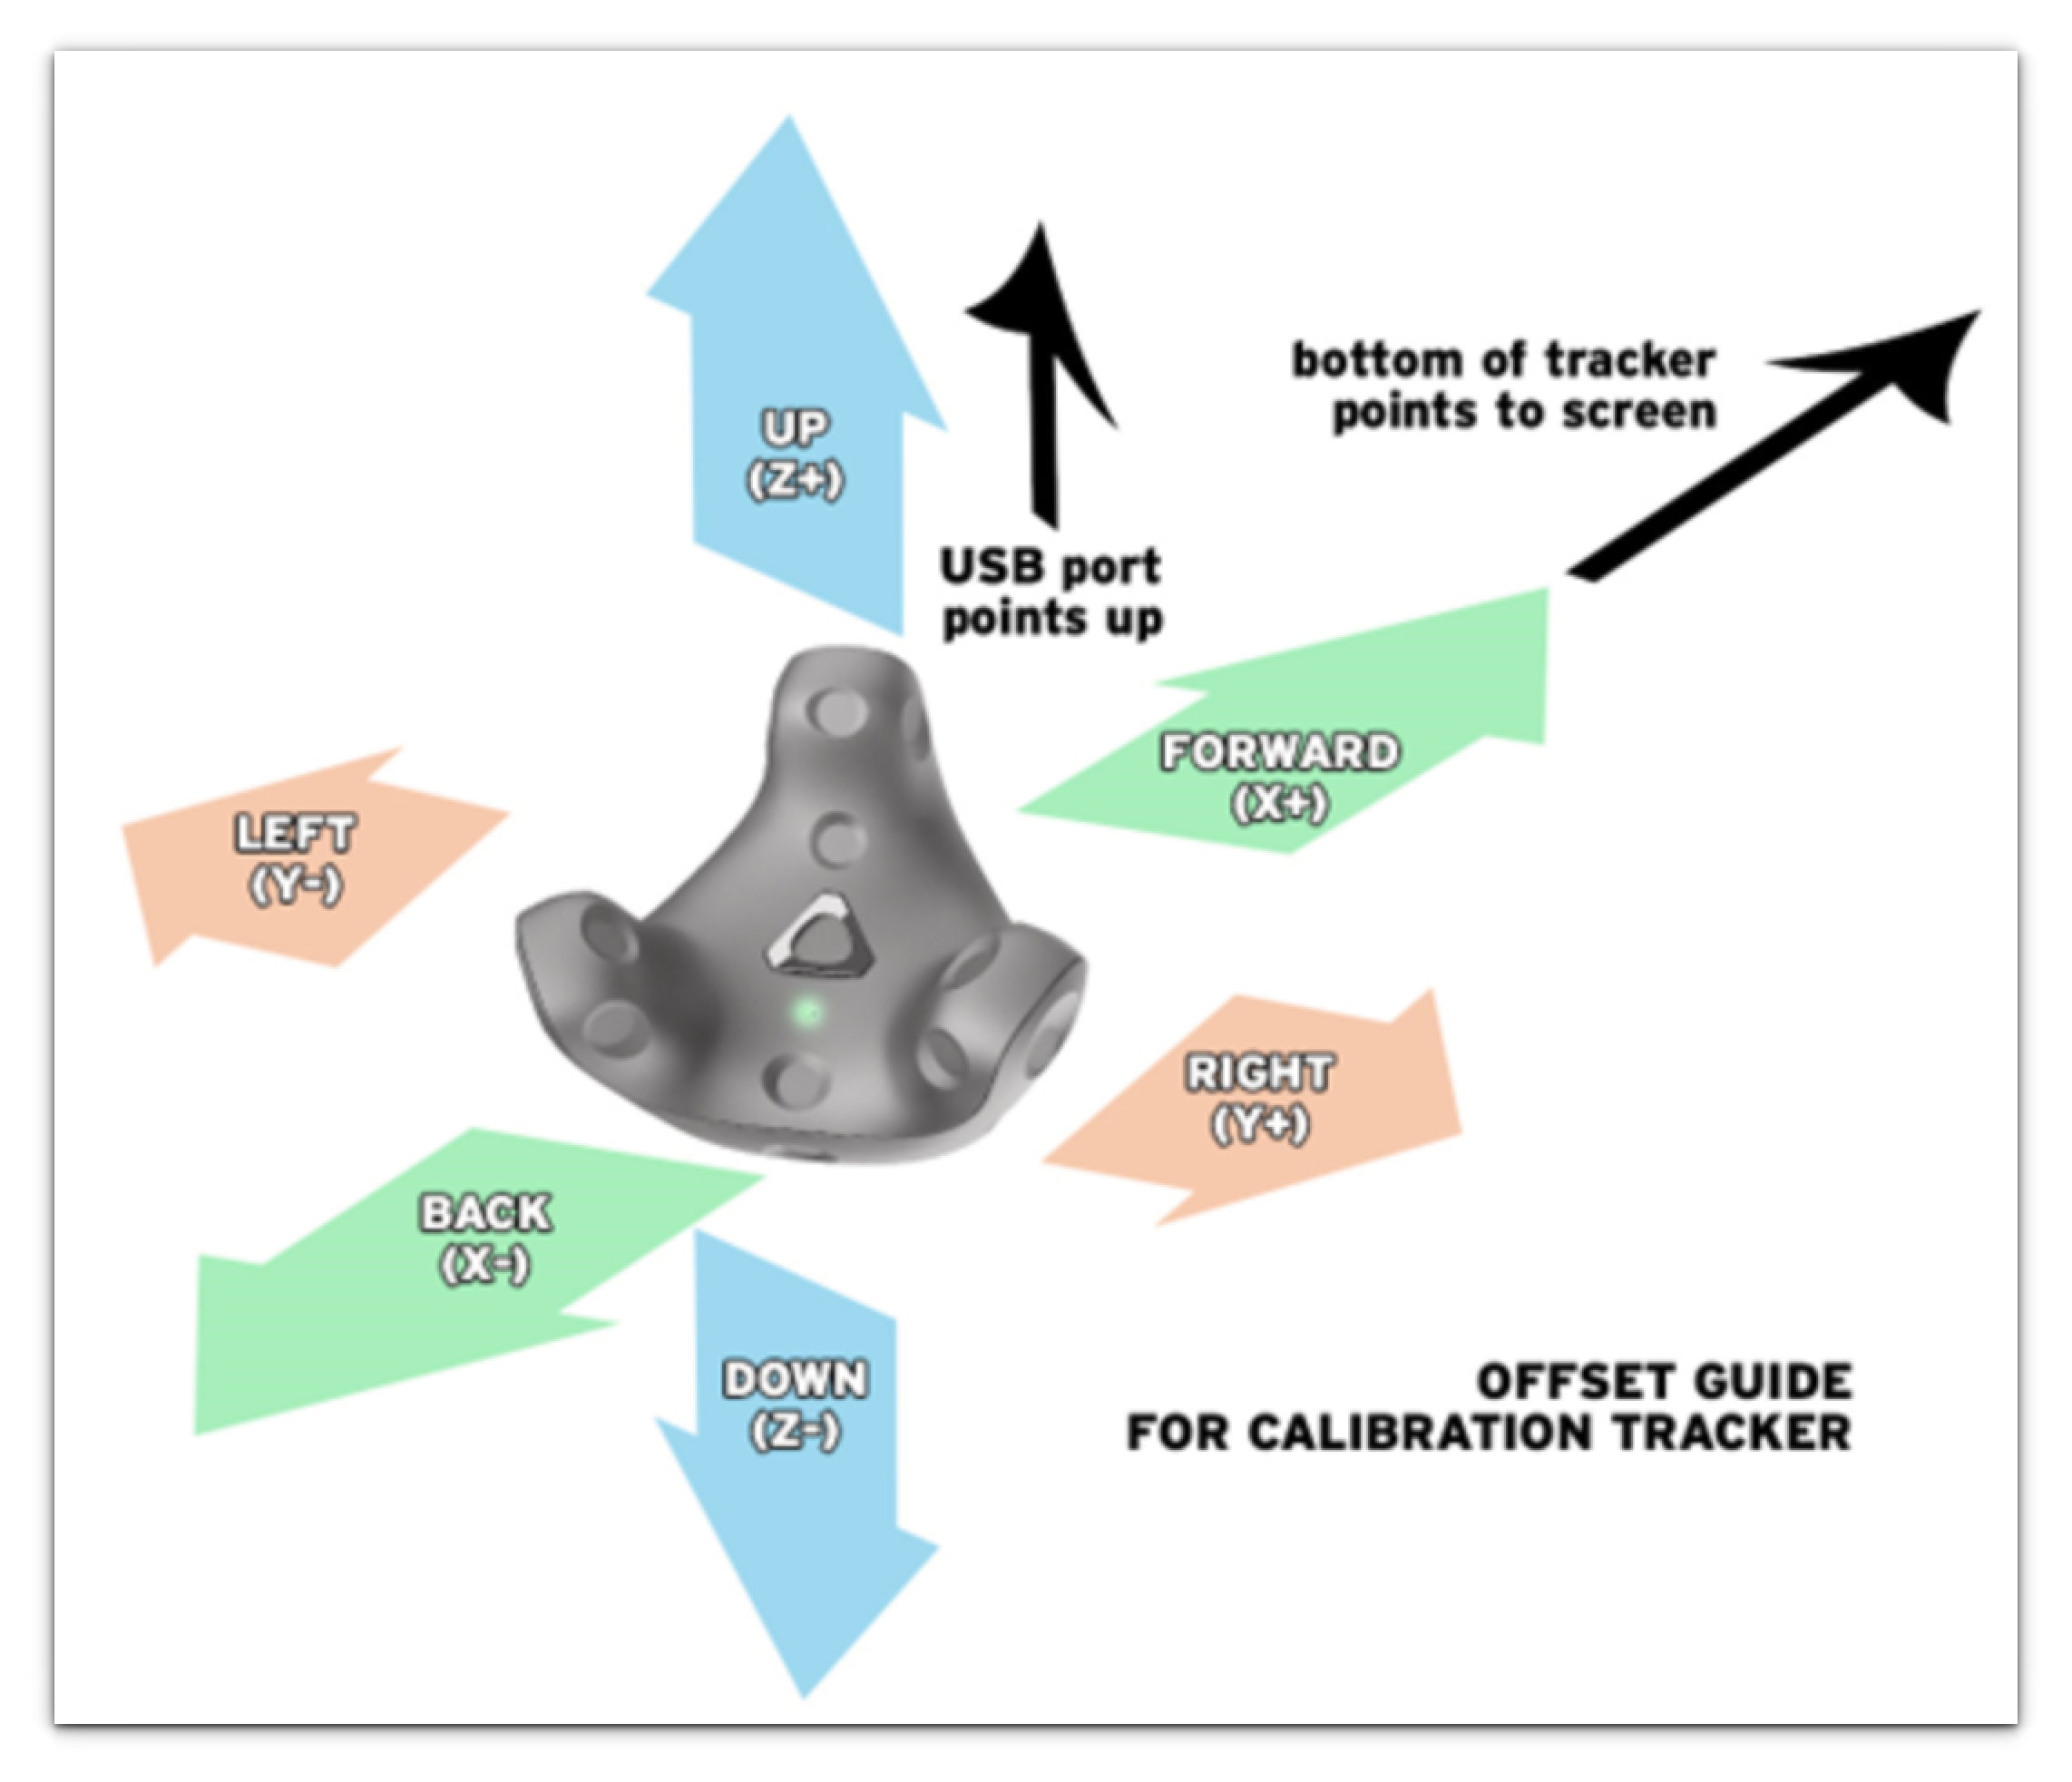
3. To offset correctly, follow the examples displayed in the image below. Left offsets negatively, right offsets positively.
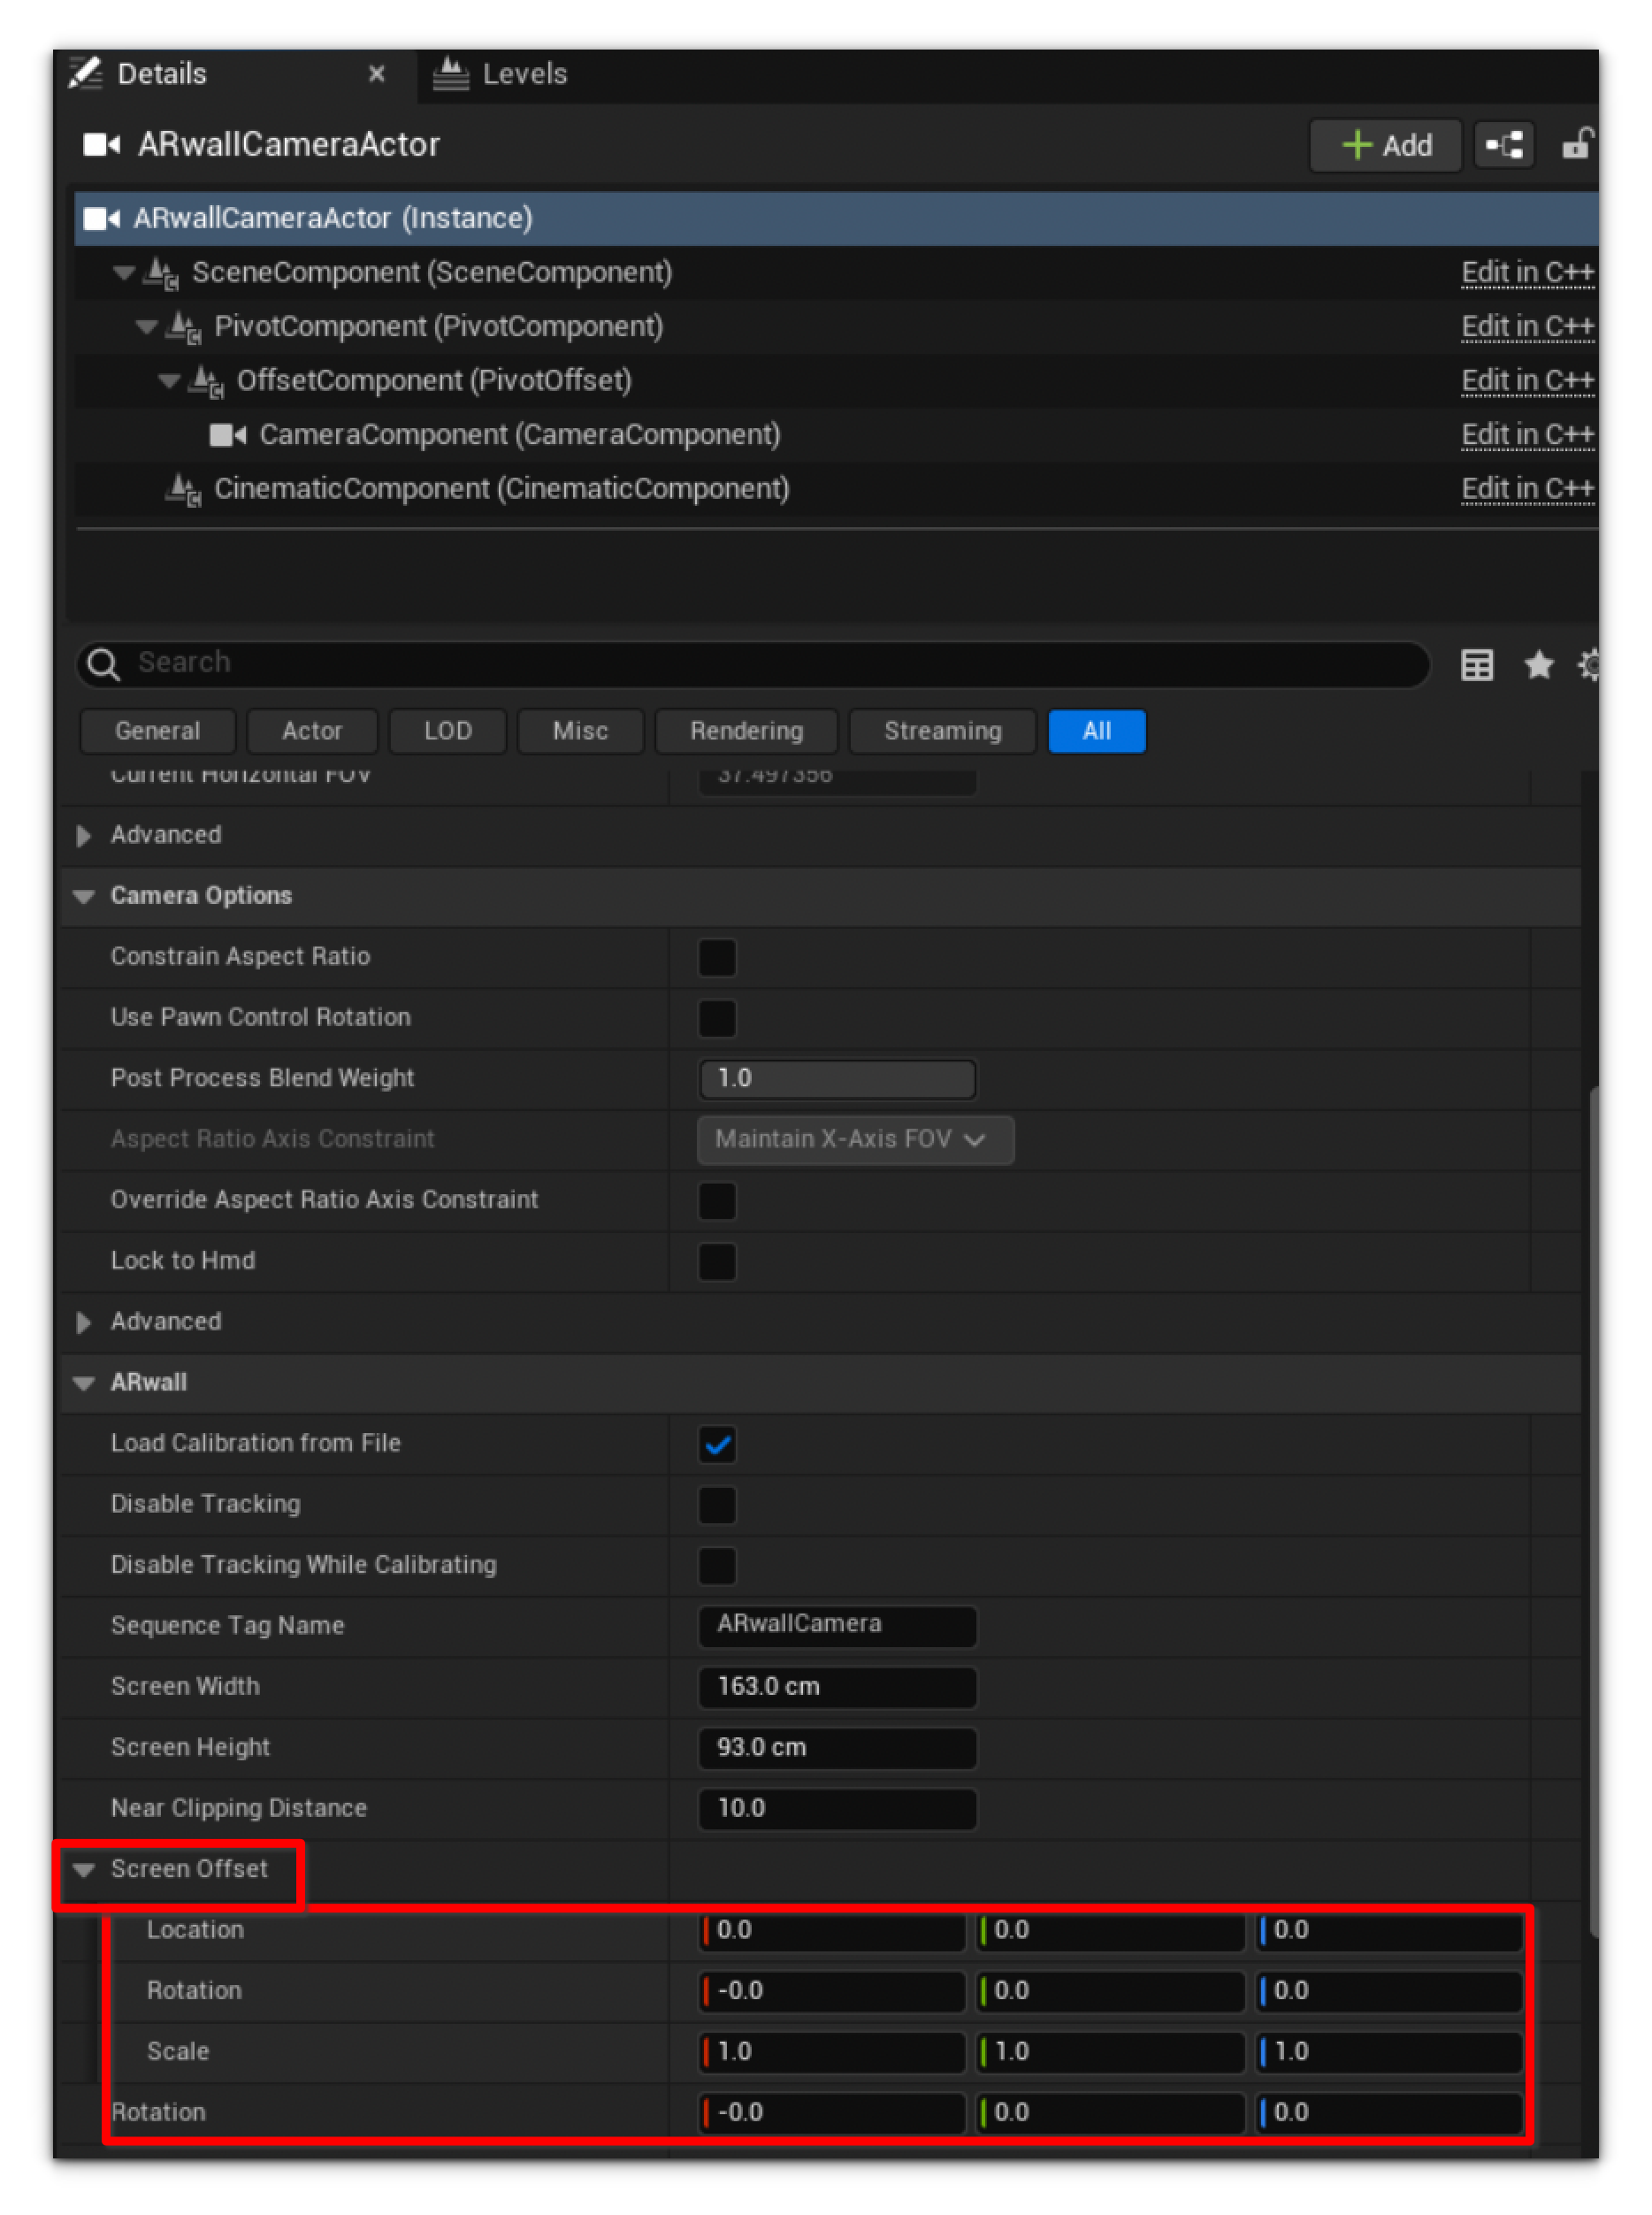
Input the X, Y, and Z-axis values determined from physical measurements into Details > ARwallCameraActor > ARwall > Screen Offset > Location’s X, Y, and Z-axes.
Section 17.3 Virtual Camera Control
This section describes how to use the ARwall camera controls for both the keyboard and Xbox controller once the ARFX Pro Plugin is launched and calibrated.
- Play the ARFX Pro Plugin scene within Unreal Engine 5.3 or 5.4 and calibrate. For further details, refer to Section 5: ARwall Setup and Settings within Unreal Engine 5.3 or 5.4 and Section 6.1: XR Sync Calibration.
- Move the Hero Tracker (tracker on the physical camera) within the designated play area as dictated by the base stations. The scene should show the correct parallax.
Here is how to tell if you are seeing the correct parallax after calibration:
Important
Here is how to tell if you are seeing the correct parallax after calibration:
Move the physical camera left, you should see more of the right side of the virtual scene environment.
Move the physical camera right, you should see more of the left side of the virtual scene environment.
Move the physical camera up, you should see more of the bottom of the virtual scene environment.
Move the physical camera down, you should see more of the top of the virtual scene environment.
Move the physical camera closer to the screen, you should see more of the virtual scene environment.
Move further from the screen, you should see less of the environment.
If this is not what you’re seeing, try calibrating again and making sure that the base stations can clearly see each other and the trackers. For further details, refer to Section 3.4, Base Station Placement.
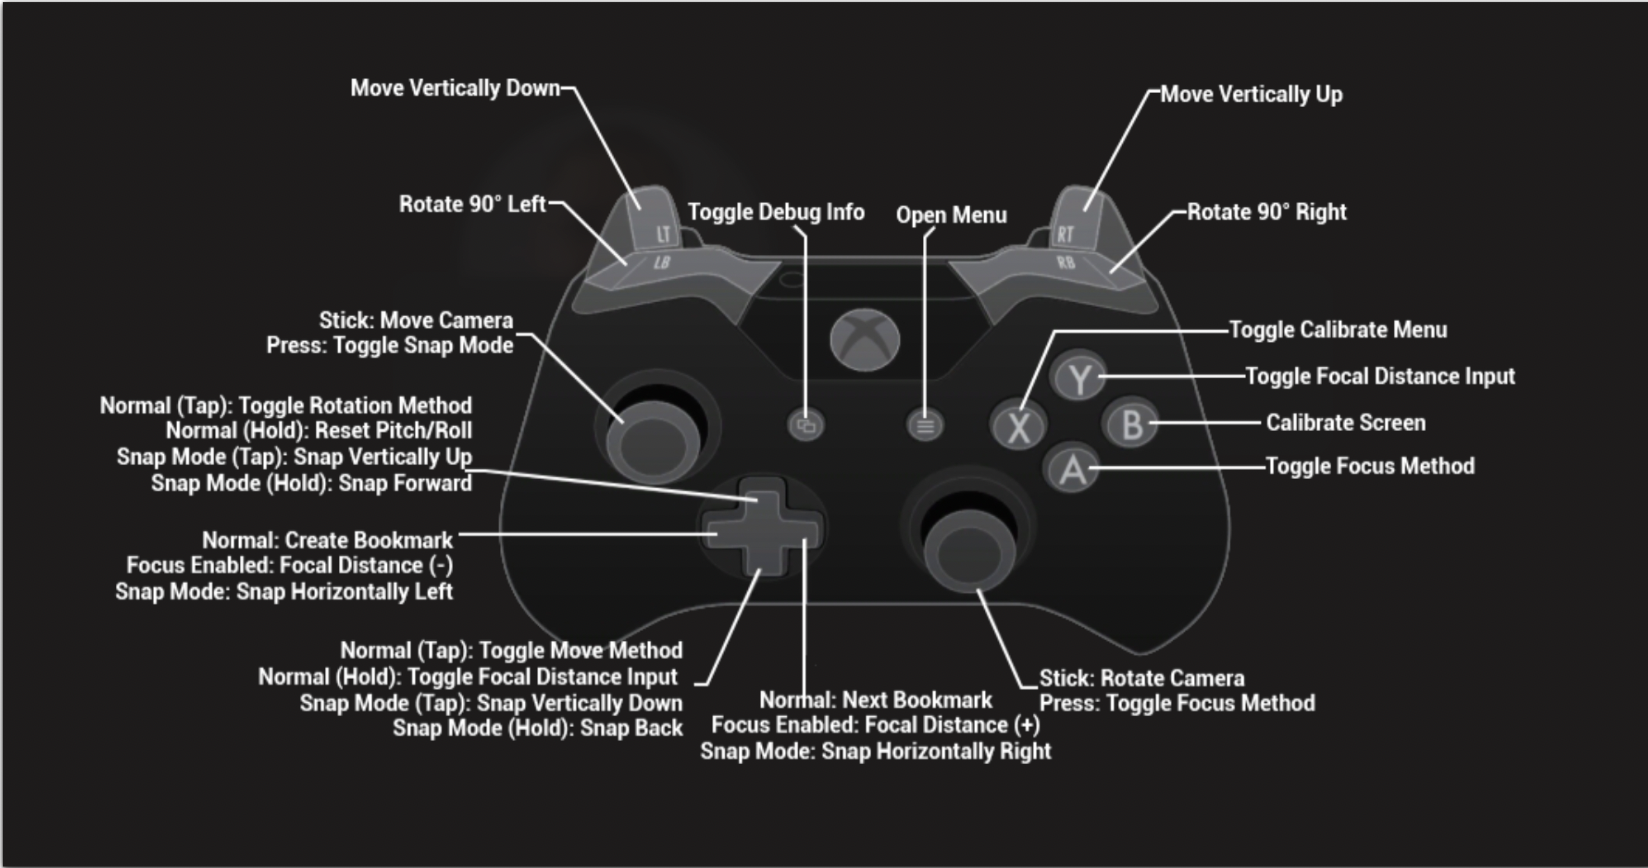
The default virtual camera controls are described in Table 4 below.
Table 4: Virtual Camera Controls
Action | Keyboard | Xbox Controller |
To move the virtual camera | Use the WASD navigation controls:
| Left Stick is the Forward, Backwards, Left, and Right control. |
To move the virtual camera up or down | Use the following controls:
| The Left Trigger is to move vertically down The right Trigger is to move vertically up |
To rotate/pan the virtual camera left or right
(Refer to Section 6.4: Input Scale if using these hotkeys does not rotate/pan) | Use the following controls:
| Right Stick pans the camera
RB (Right shoulder button) rotates 90 degrees right
|
To toggle the calibration menu | Use the Tab key:
| X button to toggle on/off |
To calibrate the screen (while holding up the calibration puck to the center of the screen crosshairs, so the parallax and camera tracking look correct)
| Use the C key:
| B button while calibration puck is held in the center of the screen |
To toggle focus method | Use the F key:
| A button or press down the Right Stick button to toggle on/off the focus method |
To toggle focal distance input (also adds focal plane) | Use the P key:
| Y button or while in normal mode: hold D-PAD Down arrow to toggle between focus enabled mode and normal mode.
While in focus-enabled mode:
|
To toggle camera debug info | Use the Z key:
| Press the View button (looks like 2 rectangles) to toggle on/off camera debug info |
To add a bookmark | Use the backspace key:
| While in normal mode:
|
To change the bookmark or preset camera angle | Use the minus (-) or equal (=) keys:
| While in normal mode:
|
To toggle the snap mode of the virtual camera
(This forces the virtual camera to snap toward a direction in the virtual environment.) | Use the T key:
| Press down Left Stick button to toggle between snap mode and normal mode.
|
To toggle the rotation method | Press the V key to toggle between:
To Rotate:
| While in normal mode: press the D-PAD Up arrow to toggle between:
To Rotate:
|
To reset the pitch & roll (move method) of the virtual camera | Press the R key to:
| While in normal mode, hold the D-PAD Up arrow to:
|
To toggle move method | N/A | While in normal mode: Tap the D-PAD Down arrow to toggle on/off, moving only in the XY plane (cannot go up/down)
|
To bring up the menu system | Press the ESC key or Backslash (\) to:
| Press the Menu button (looks like a hamburger menu) to Open the menu system, where you can control ARFX settings, Post Process, Hotkeys/controls, audio, etc.
|
To enter Fullscreen in Play mode (if the ARFX screen popups as a window, use this to set it to full screen) | Select the ARFX Screen and press the F11 key:
| N/A |


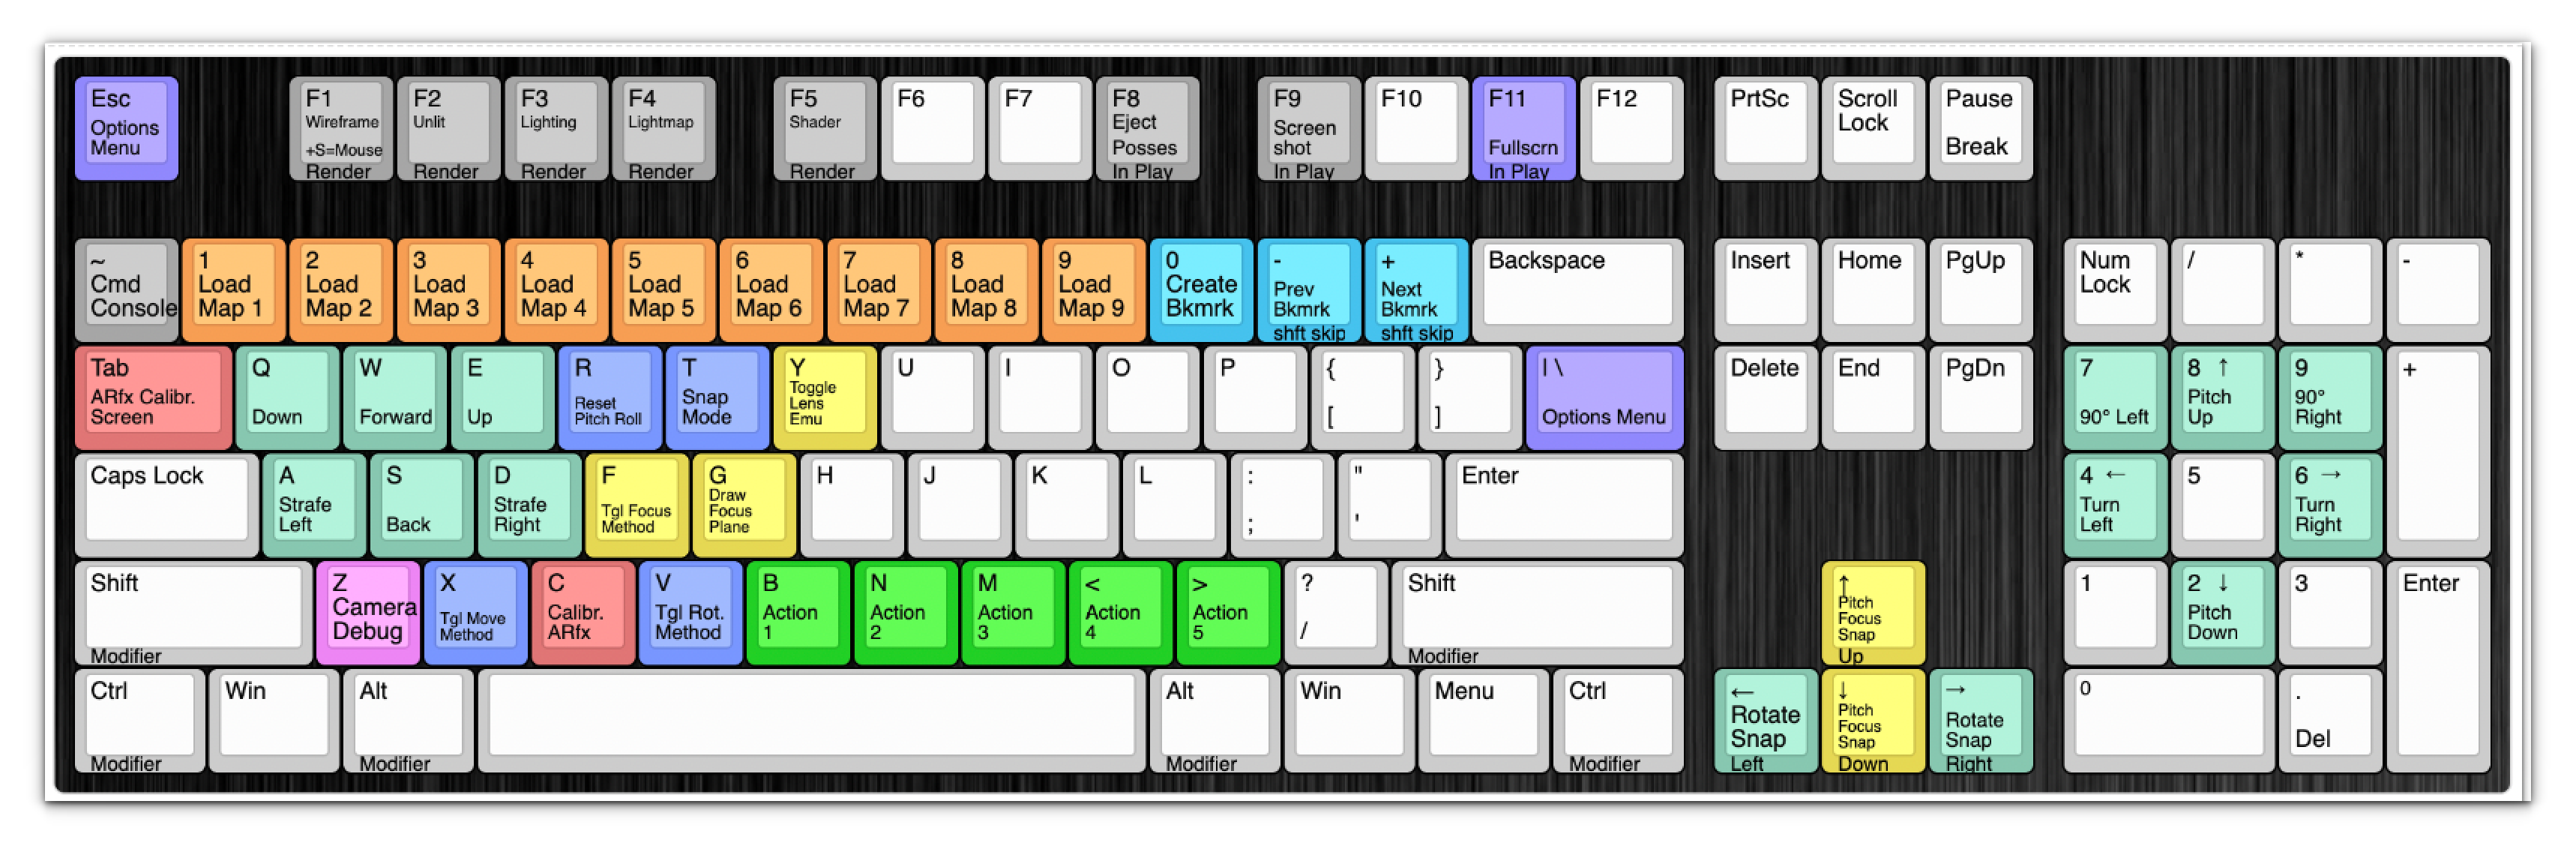
Refer to the keyboard hotkeys online here.
Section 17.4 Input Scale
This section describes how to adjust the movement speed of the ARwall camera controls for both the keyboard and Xbox controller once the ARFX Pro Plugin is launched and calibrated.
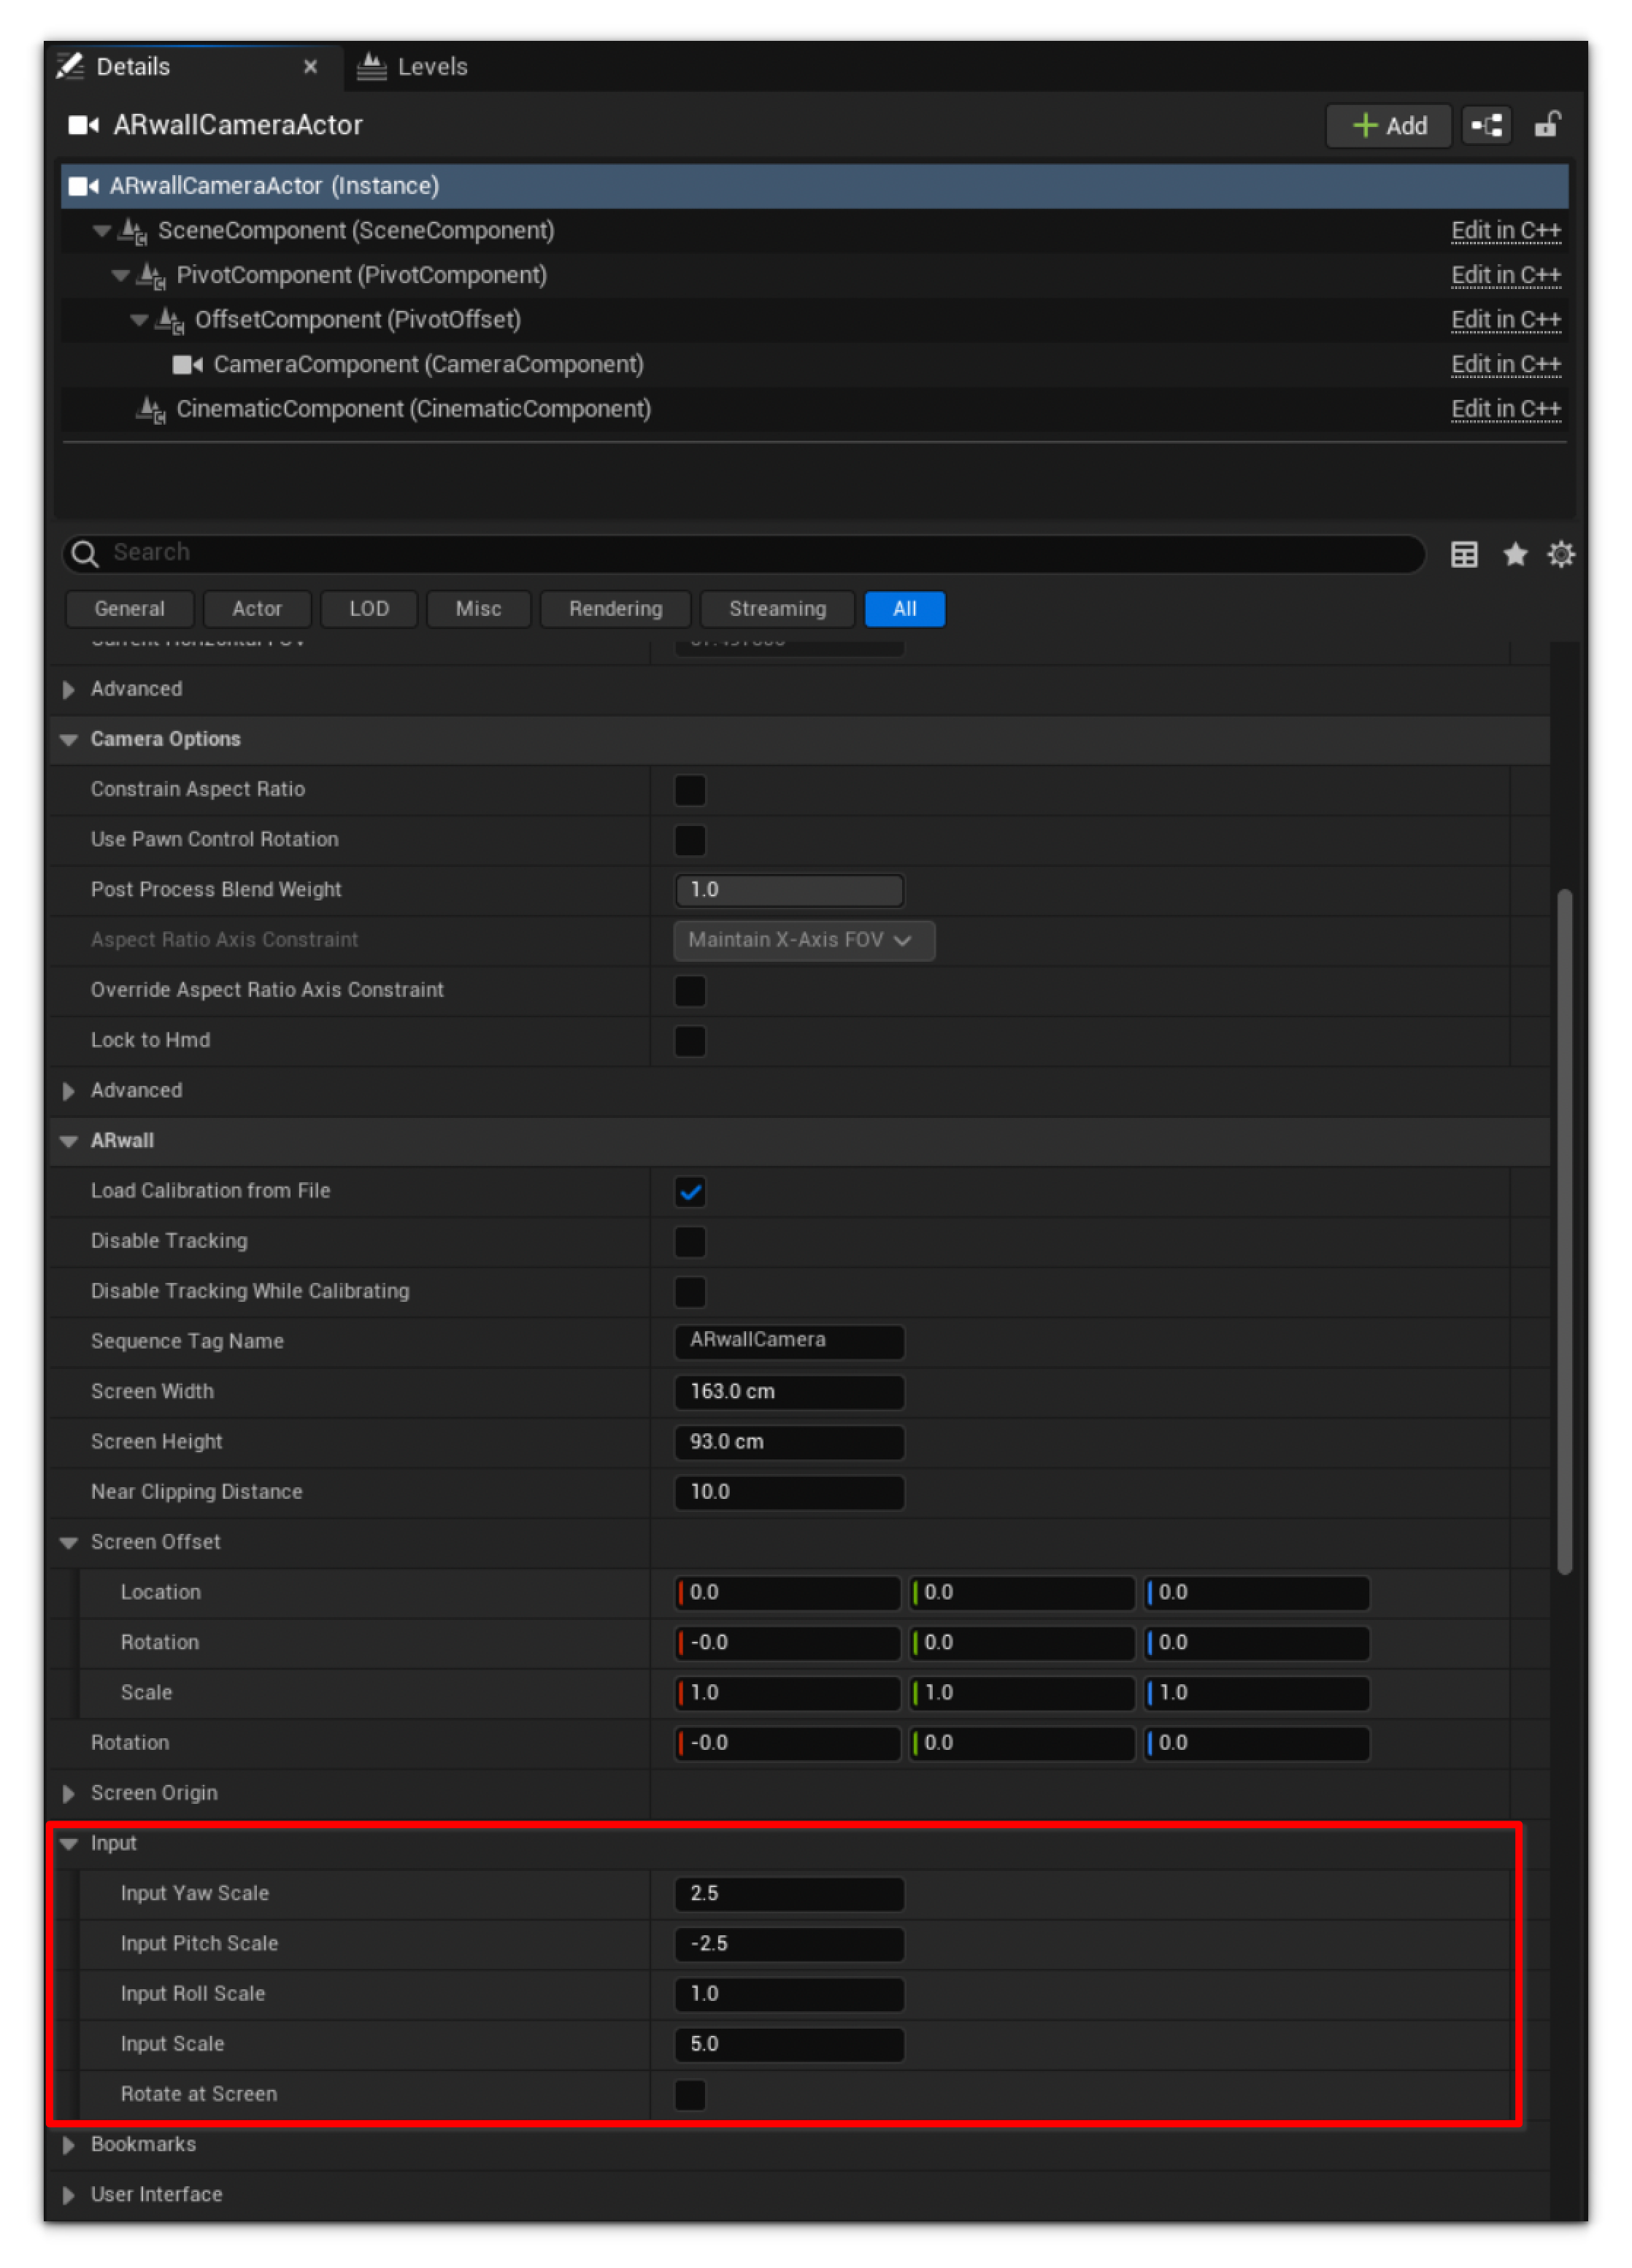
- If the arrow keys described in Table 4 above, which are used to rotate/pan the camera left or right, are not working, verify whether the four Input Scale options (Input Yaw Scale, Input Pitch Scale, Input Roll Scale, and Input Scale) inside the ARwall Camera match or have a value higher than 0 as displayed in Figure 5: ARwall Inputs below.
2. If moving the virtual camera is too slow or fast while using WASD or the XBOX Controller left stick, adjusting the Input Scale higher or lower will adjust this speed.
3. For instance, if a map is very large in scale, a higher Input Scale value (around 10-50) will help traverse the map more quickly. Conversely, if the Input Scale value is too high on a smaller map, lowering the value to 5-10 might be preferable.
Section 17.5 Distance to Hide Object Near Camera.
This section describes how to adjust the ARwall camera's near-clipping distance once the ARFX Pro Plugin is launched and calibrated to remove unnecessary planes that block the virtual camera view. This distance is great for tight shots when a virtual plane or object is blocking the virtual camera view.
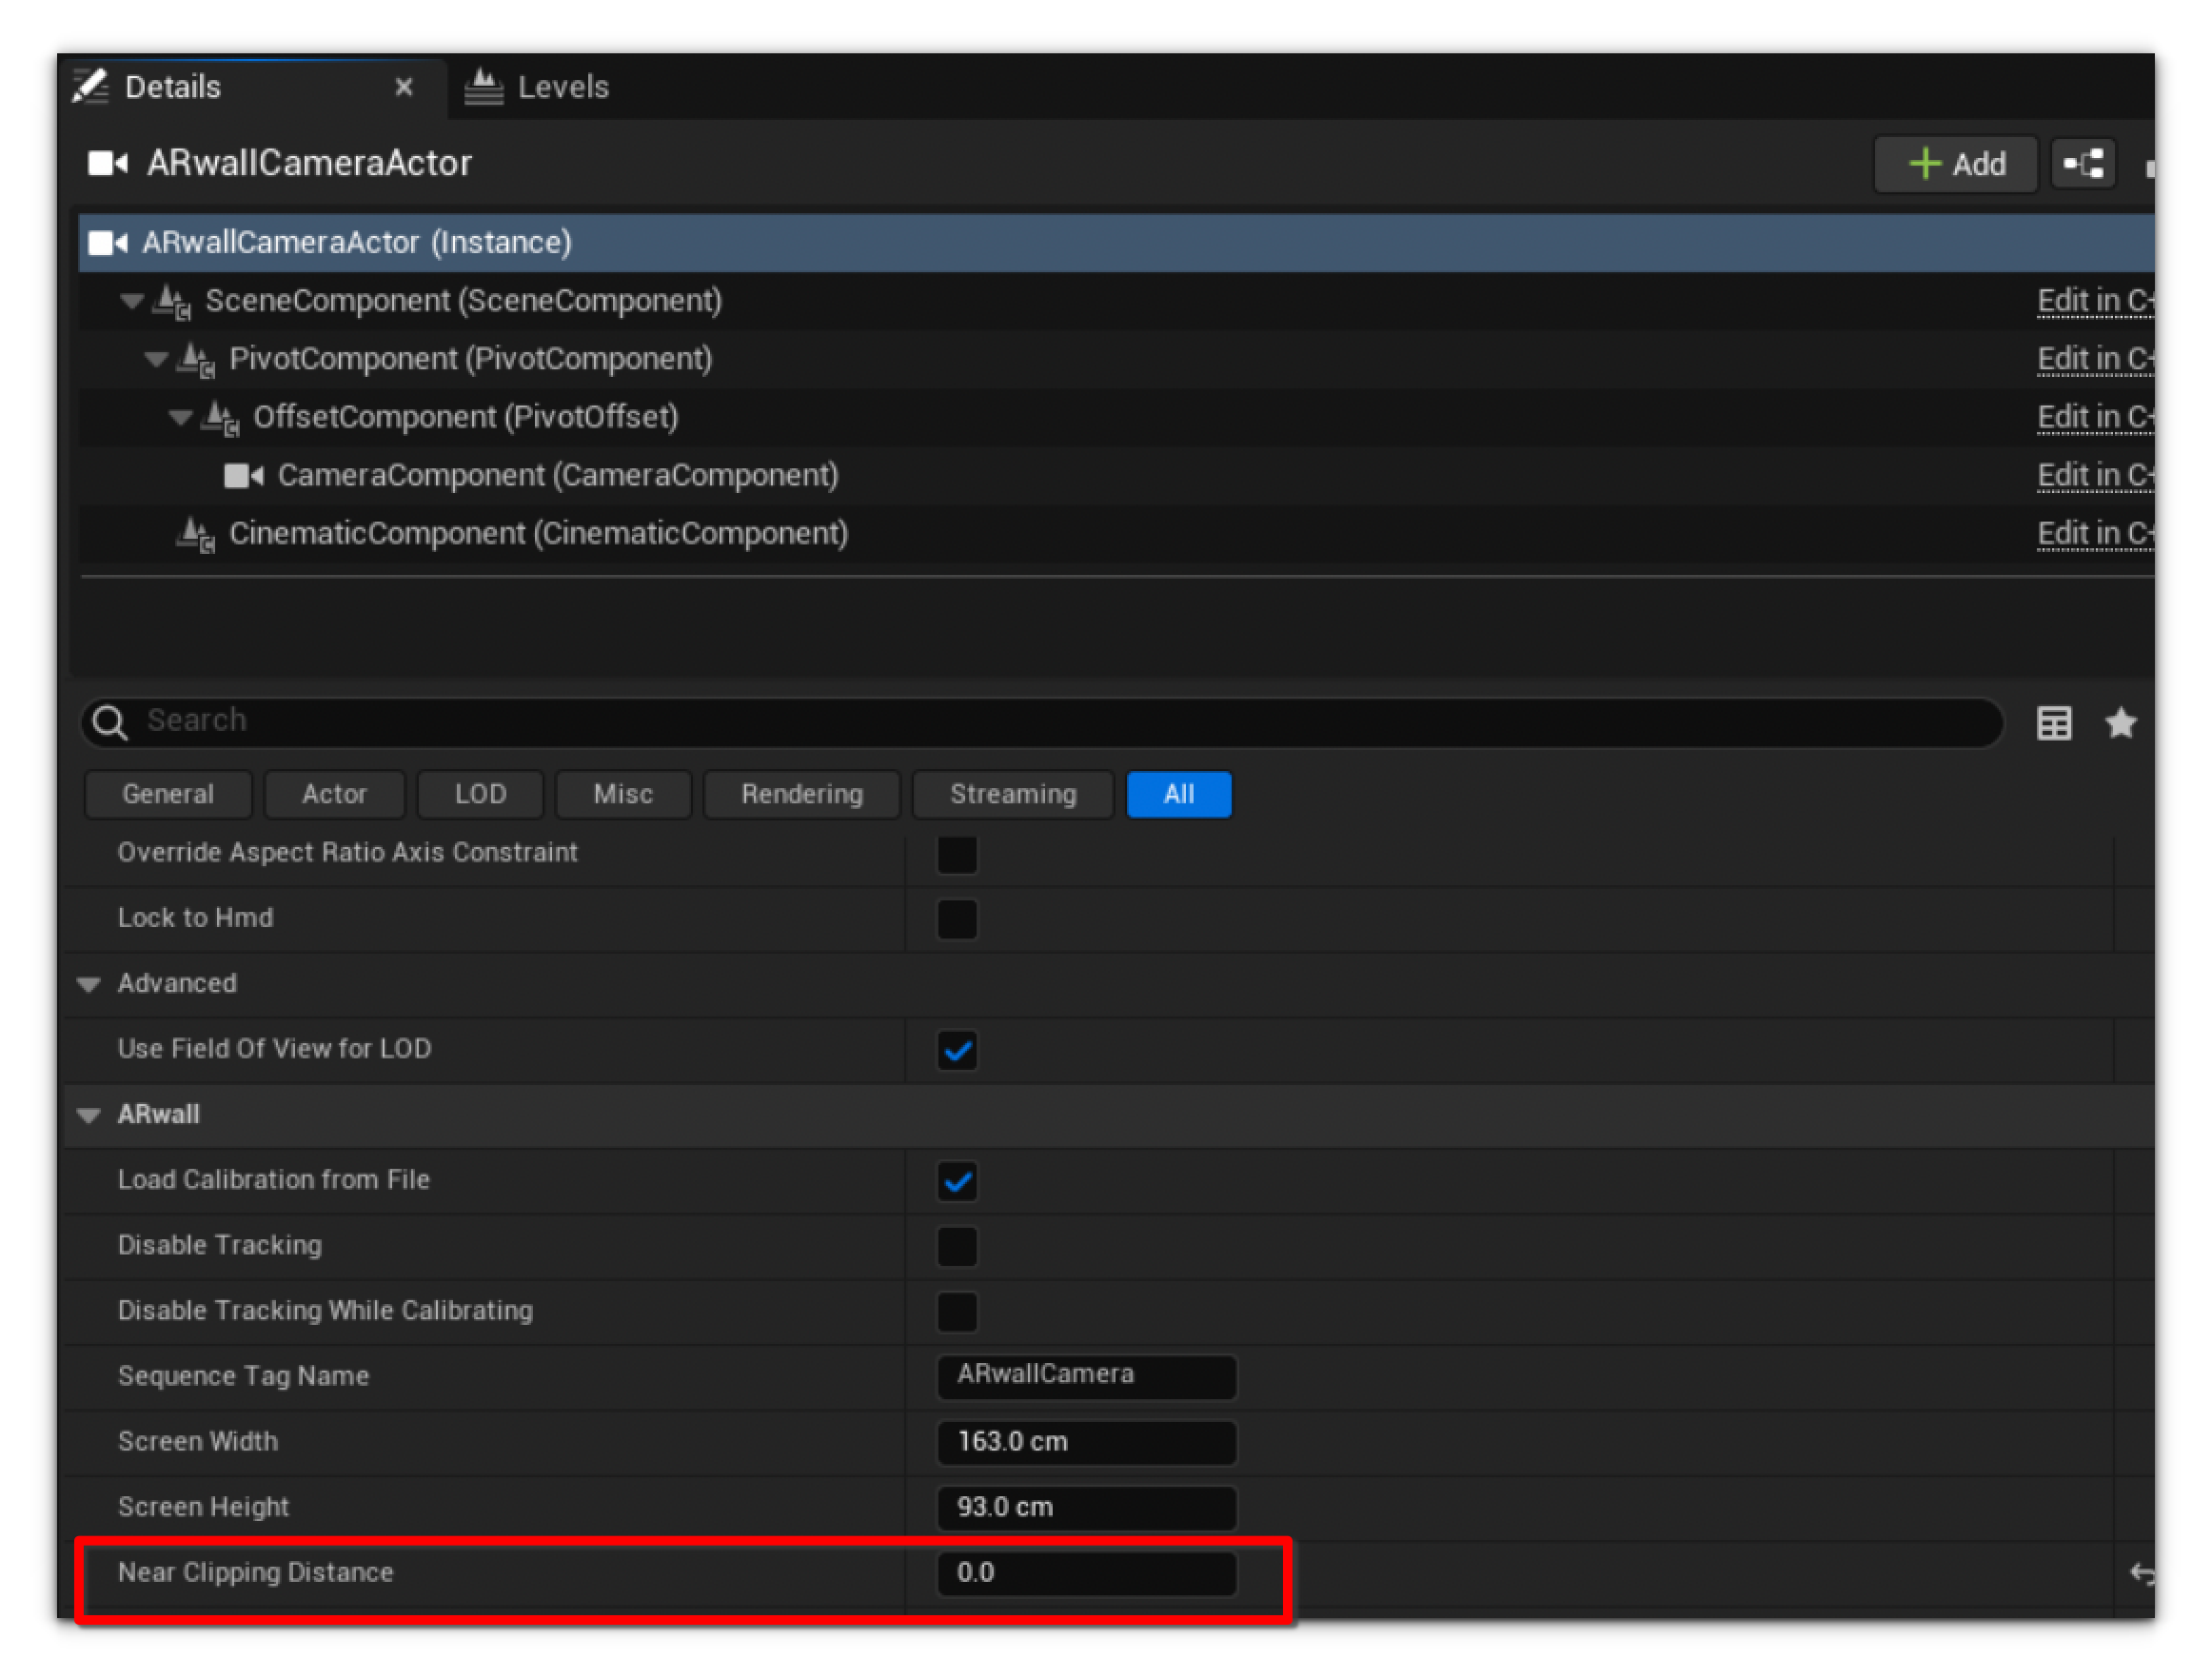
- If composing a shot and the virtual camera is blocked or clipping through a surface or object, use Near Clipping Distance to “clip away” the virtual surface/object to unblock the virtual camera view. While in play mode, this can be adjusted in one of two ways:
- In Unreal Engine:
- Navigate to ARwall Camera Actor > Details > ARwall >Distance to Hide Objects Near Camera.
- Adjust the value to see the blocking virtual plane disappear/reappear.
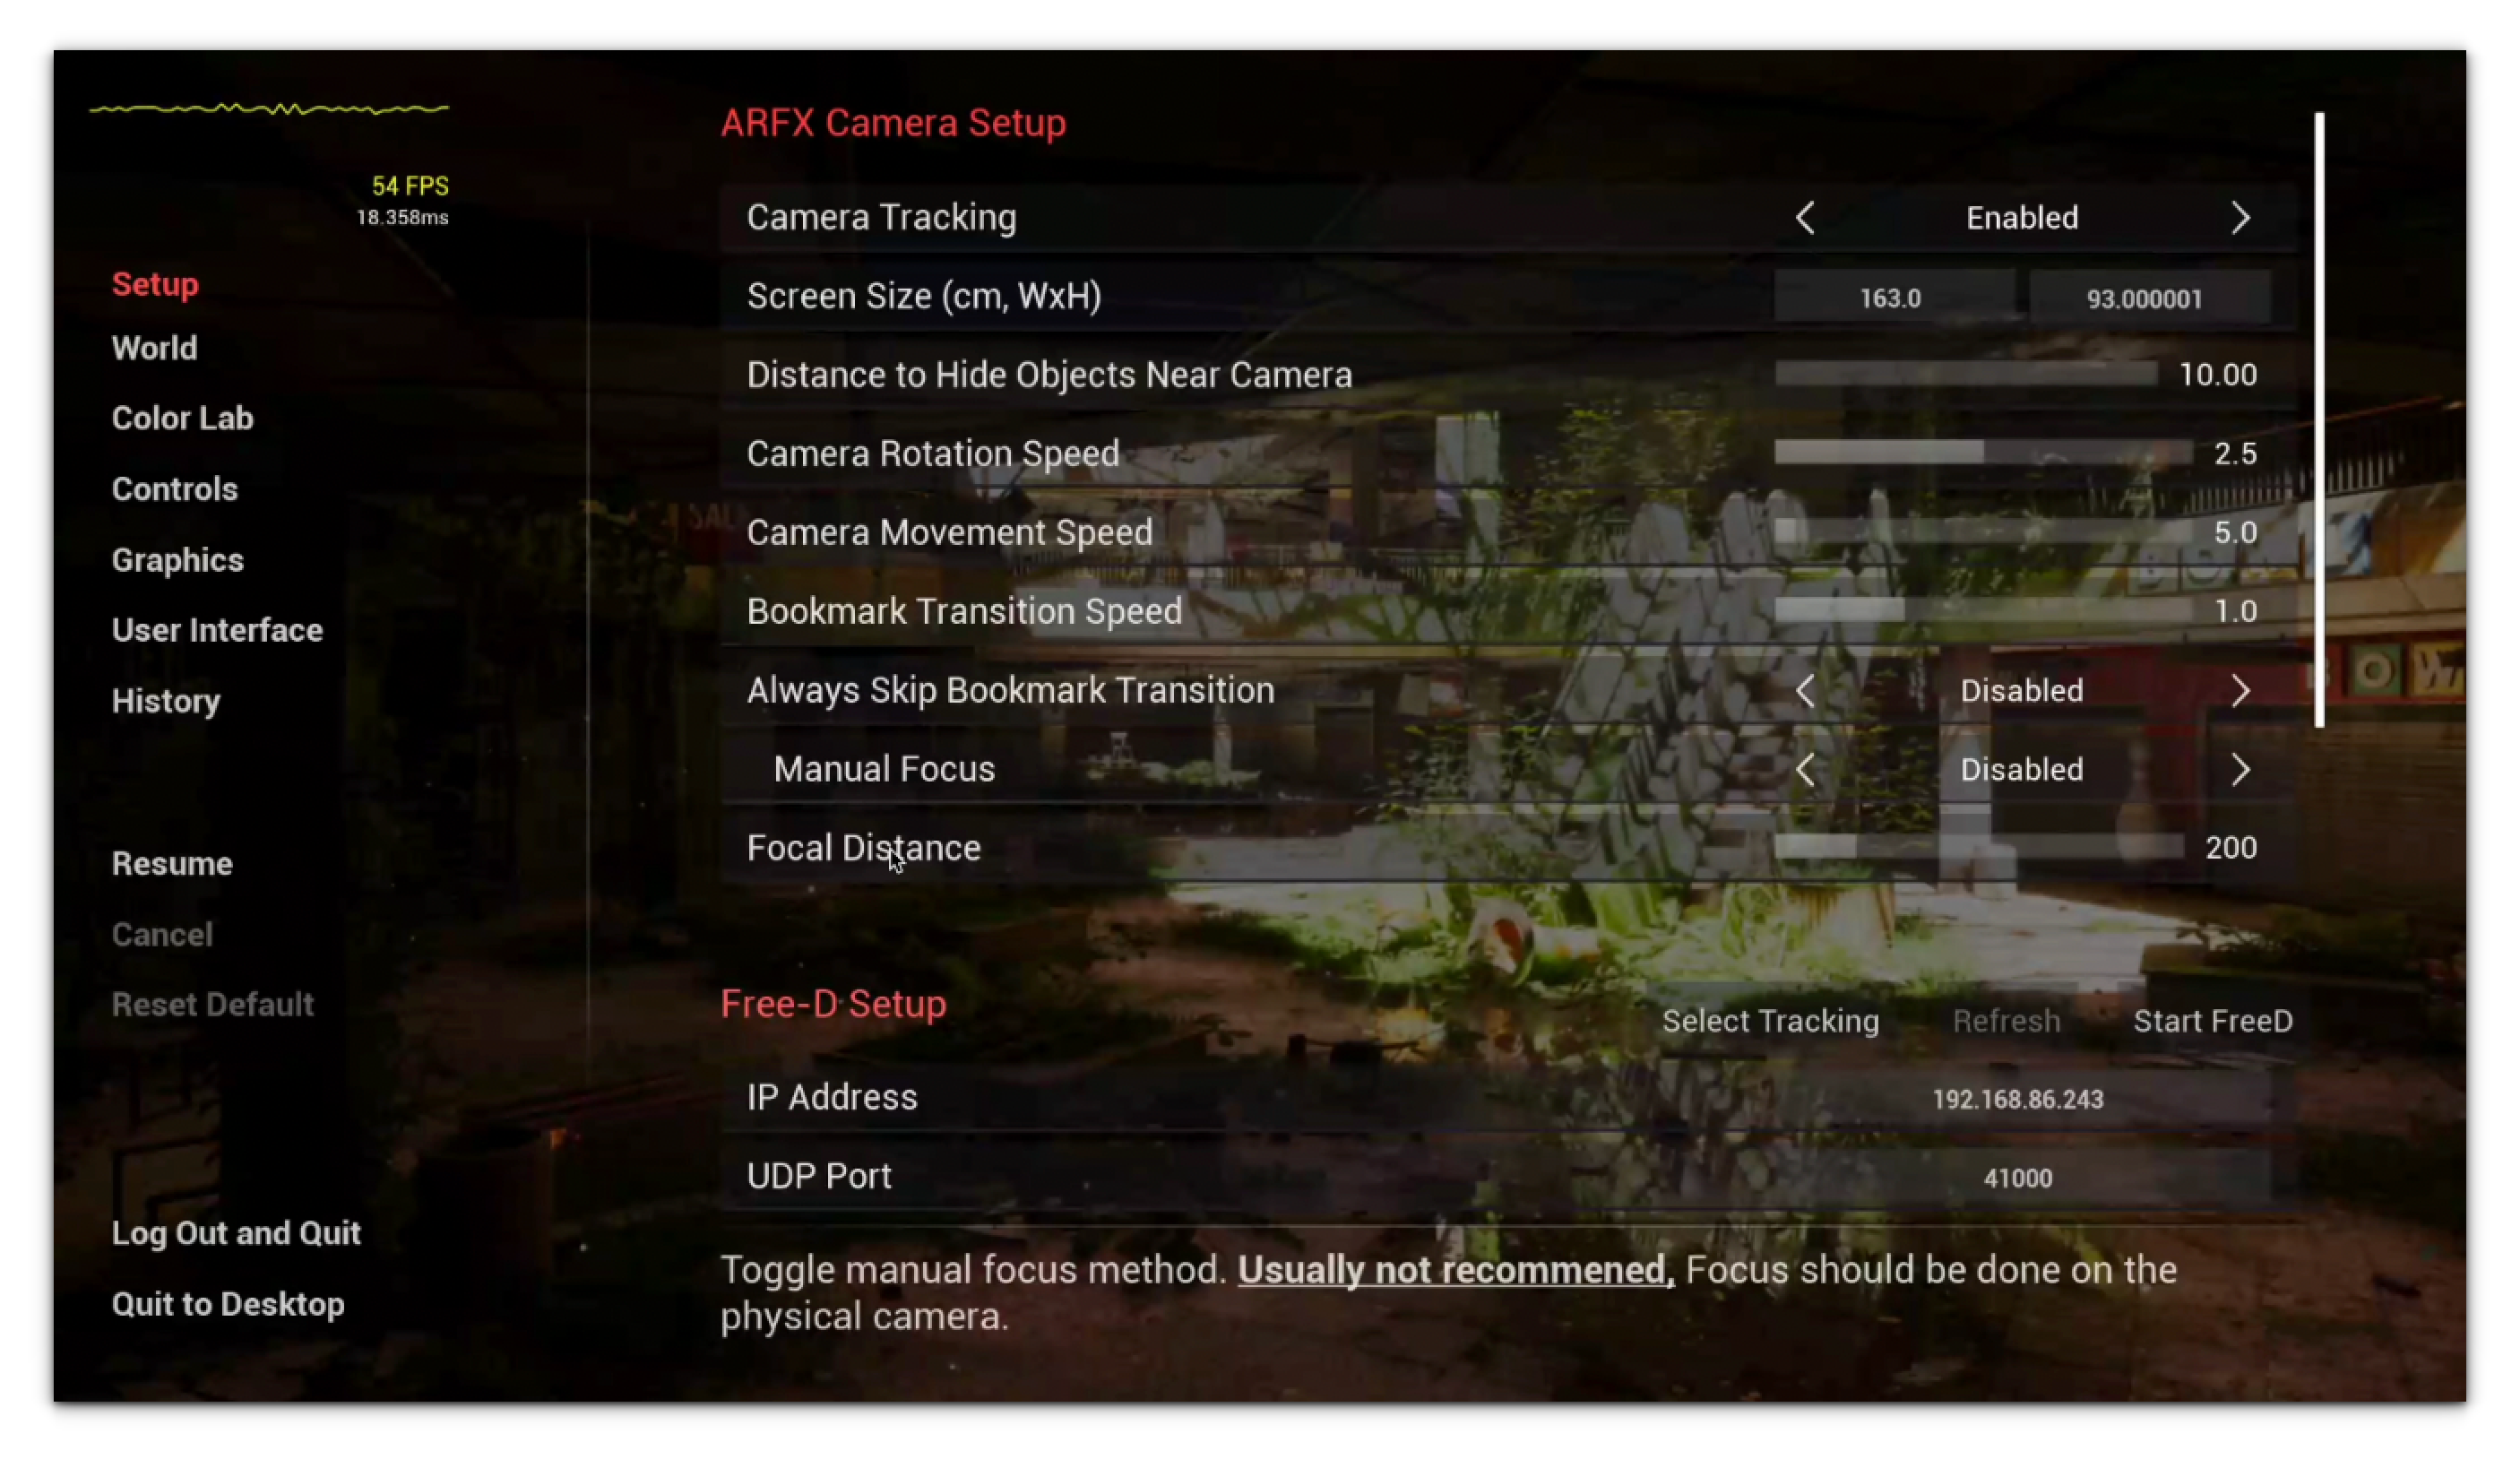
5. In ARwall Options Menu:
- Press Backslash on the keyboard to toggle on the ARFX Options Menu and navigate to Setup > ARFX Camera Setup > Distance to Hide Objects Near Camera
- Adjust the value to see the blocking virtual plane disappear/reappear.
Important
A higherDistance to Hide Objects Near Camera value will disappear anything near that distance to the virtual camera. Readjust to a lower value if too many objects/surfaces disappear.
Was this article helpful?