ARFX Options Menu
- 07 Aug 2025
- 19 Minutes to read
- Contributors


- Print
- DarkLight
ARFX Options Menu
- Updated on 07 Aug 2025
- 19 Minutes to read
- Contributors
- Print
- DarkLight
Article summary
Did you find this summary helpful?
Thank you for your feedback!
Section 16. ARFX Pro Plugin Options Menu
The options menu is an in-play user interface used on all ARFX Cameras by default and can be accessed by pressing Escape or Backslash (gamepad: start). Its purpose is to give users an all-in-one place to setup, customize, and optimize your virtual scene without having to rely on much general expertise of the Unreal Engine. Primarily used by ARwall’s pre-built scenes, this menu should allow you to get running in a few simple steps.
Important
This menu is not intended to be used in Unreal Editor due to how it saves and overrides settings during play.
Here are things to keep in mind about this menu:
You should be able to navigate most of this menu with both mouse and gamepad
Every option has a description when highlighted to let you know what each one does.
Changes made to the Color Lab are added to the History section.
Pressing the options menu button again will close you out of the menu.
Only one major UI can be open at a time. Opening this menu when the Calibration screen is up will force the calibration to end.
Section 16.1 About the Frame Rate Widget
Shown throughout the Options menu and in the Debug menu, the FPS widget is your way to judge if your scene needs some graphical tweaks or not.
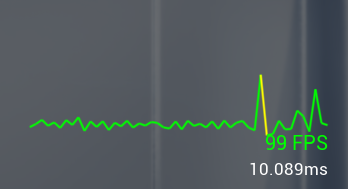
At the top left of the menu, you will see an active frame rate (or FPS ) widget. This widget, the same that can be found in ARFX’s debug menu, will accurately tell you your current frame rate and frame timings as a graph. You will want this to be at 60fps and above at all times when using a scene and the information shown will change color depending on how your frame rate is going.
The one exception to the 60 fps minimum is when you are using Genlock on Unreal and your screen to match the frame timing of your recording camera.
Green: 60 and above
Yellow: 31 – 59
Red: 30 and below
To access our menu system, simply press the ESC or Backslash (\) key.
ARFX has integrated all the necessary features to allow you to quickly access all your favorite tools in one location, all accessible while still in play mode.
Section 16.2 Setup
ARFX Camera Setup
The Setup section of the options menu pertains to all relevant settings for the ARFX Camera and its particular tracking Component. The Setup section is what you’ll see first when opening the options menu. From here you can setup your physical screen’s size, setup your tracking information, and more. If it has something to do with our ARFX Camera, it will be found here.
.png "image(82).png")
Camera Tracking: Toggle camera tracking on and off as needed for your scene.
Screen Size (cm, WxH): Allows you to define the physical dimensions of the screen in centimeters.
Distance to Hide Objects Near Camera: Distance at which the camera will clip objects too close to the screen. Also known as Near Clip Distance.
Camera Rotation Speed: Adjust the speed of the camera’s pan and tilt movements.
Camera Movement Speed: Set the speed at which the camera moves around in the scene.
Bookmark Transition Speed: Define the speed at which the camera will transition between different bookmarks.
Always Skip Bookmark Transition: If enabled, the camera will skip transitions and move directly to the next bookmark’s location.
Manual Focus: Toggle manual focus. Note that it is usually recommended to manage focus through the physical camera rather than software.
Focal Distance: Set the focal distance for manual focus. Again, physical camera adjustments are recommended over software-based focusing.
Tracking Method - Free-D Setup
This section allows you to select and configure your tracking method. If you chose SteamVR as the tracking method during installation, you will see SteamVR settings here. More on Free-D can be found in ARwall's FreeD Tracking Component Section of the Knowledge Base.png "image(85).png")
If you choose Free-D, you’ll see the Free-D setup options. You can also change your tracking method by clicking the “Select Tracking Method” button.
Start FreeD - Starts/Stops the Free-D receiver. This button should change to say Stop Free-D when setup correctly. If it does not, then either the IP address doesn’t match one found on this machine or the port is already in use.
IP Address - The IP address of this computer on the same network as the device providing FreeD tracking data.
UDP Port - Port number to connect to the address above.
This List of Trackers - Only shows when you have successfully connected to a tracking provider. You can set any tracker found to be your Hero or Calibration tracker. If there is only one tracker, then leave it set to Hero and enable Use Hero Tracker as Calibrator
SteamVR Setup
This menu is only available when using the SteamVR tracking component.
More on SteamVR can be found in Track SteamVR of the Knowledge Base.
.png "image(431).png")
Patch SteamVR - Changes SteamVR's configuration to disable the requirement for an HMD (Head Mounted Display). If it is already disabled, the button will disable itself and the indicator text will change to how it is shown above.
Hero Tracker Serial - Serial number for the hero tracker. Pressing Auto will assign the first connected tracker found (if any).
Calibration Tracker Serial - Serial number for the calibration tracker. Pressing Auto will assign the second connected tracker found (if any).
Tracking Delay - Delays tracking by this number of frames
Use Tracking Velocity Clamps - Toggles velocity thresholds on/off.
Bypass Clamps for Calibration - If enabled, the calibration tracker will always use unfiltered positions
Threshold Sample Size - Number of samples we take to determine velocity and angular velocity
Velocity Threshold - Speed at which we start tracking.
Angular Velocity Threshold - Rotational speed at which we start tracking.
Tracking Setup
.png "image(84).png")
User Hero Tracker as Calibrator: Allows the hero tracker to act as the calibrator tracker.
Lock Tracking Rotations: Zero all rotations and locks it so that they are never used.
Disable Tracking While Calibrating: Disables tracking of the camera while the calibration mode is enabled
Tracking Modifiers
.png "image(86).png")
Flip X-Axis: If enabled, this flops the X-axis position data.
Flip Y-Axis: If enabled, this flops the Y-axis position data.
Flip Z-Axis: If enabled, this flops the Z-axis position data.
XYZ to ZYX Coordinates: Swaps Forward/Back movement to be Up/Down
XYZ to XZY Coordinates: Flips Right/Left movement with Up/Down.
Section 16.3 World
Time of Day and Weather
.png "image(88).png")
Current Time: Set the time of day for the scene. The time is displayed in a 24-hour format, allowing you to precisely control the time within the virtual environment.
Animate Time of the Day: If enabled, this feature will allow the sun and moon to move across the sky based on the time set, creating a realistic day-night cycle.
Day Length: If “Animate Time of the Day” is enabled, this setting controls how long a day lasts in real-time, influencing how quickly the sun and moon transition.
Night Length: Similarly, this controls the length of the night in minutes when “Animate Time of the Day” is enabled, determining how long the moon stays visible.
Weather: Choose and set the current weather conditions in the scene, such as clear skies, rain, or storms.
Cloud Render Quality: Adjust the quality of cloud rendering in the scene. Higher-quality clouds may look more realistic but could be more resource-intensive, depending on your hardware.
Cloud Height: Adjust the vertical height at which clouds appear in the sky to suit the environment you are simulating.
Height Fog: Control the density and appearance of fog at certain heights within the scene.
Volumetric Fog: Enables the use of thicker physical volumetric fog. It can be very resource intensive depending on hardware and settings
Volumetric Fog Distance: This enables the use of thicker physical volumetric fog. Depending on hardware and settings, it can be very resource intensive.
Section 16.4 Color Lab
General Settings
The Color Lab allows for a wide variety of color controls!
The Color Lab is a list of every color related control that could be typically found in a PostProcessVolume. The settings here generally affect any PPV that has been set to infinite in a scene (prioritizing any PPV with “global” in its name). In ARwall’s built individual scenes, this PPV is a second one that ;blends your changes made atop whatever color settings have already been placed by our designers.
We will not be going over every setting here, but we will highlight two of the most important points.
.png "image(432).png")
Global Blend Weight: This option affects how heavily the changes made in this menu affect the PPVs already placed within the scene. By default, this is set to 0.5 or 50% blend weight. At 100%, you are completely overriding the original PPV with your own changes.
Global Gain:
Global Temperature: Temperature in Kelvin
Global Tint
Global Contrast
Highlights Gain
Midtone Gain
Shadow Gain
Temperature
.png "image(89).png")
Temperature Type: Select the type of temperature calculation.
Temperature: Temperature in Kelvin
Tint
Global
.png "image(90).png")
Shadows
.png "image(91).png")
Midstones
.png "image(92).png")
Highlights
.png "image(94).png")
Misc
Blend Weight: Controls how much the settings of this menu affects the scene’s default color settings
Blue Correction:
Expand Gamut:
Tone Curve Amount
Section 16.5 Controls
You will first be greeted by a keyboard with all the controls. You can change the UI to view the controller settings instead by clicking ‘Show Default Gamepad Controls’ at the bottom of the screen.
In the top right corner, you can select ‘Customize Controls’ where you can customize every single hotkey on both keyboard and controller. You can also ‘Reset’ all hotkeys to the default inputs.
By default, you will be greeted with the image of the gamepad’s default controls.
.png "image(433).png")
By clicking on Show Default Keyboard Controls you will be shown an image of the keyboard instead.
.png "image(434).png")
Clicking Customize Controls will show you a list of all controls that you can customize.
.png "image(435).png")
You are not allowed to customize certain controls or the gamepad at all. The reasoning for this is that these controls are vital for certain functionality to be implemented correctly given the lack of buttons available (if we mapped out everything on a keyboard, there would be no buttons left to use for any custom controls).
For more information on controls, please visit the ARFX Camera Inputs Section of the Knowledge Base.
ARFX Setup & Utilities
.png "image(115).png")
Toggle Calibration Menu: Tab (or Gamepad X)
Calibrate Screen: C (or Gamepad B)
Toggle Debug Information: Z (or Select)
ARFX Visual Functions
.png "image(114).png")
Toggle Focus Method: F
Focal Distance Up: Num 3
Focal Distance Down: Num 1
Toggle Focus Debug Plane: G (or Gamepad Y)
ARFX Pro Camera Movement
.png "image(71).png")
Move Camera Forward
Move Camera Back
Move Camera Left
Move Camera Right
Move Camera Up
Move Camera Down
Rotate Camera Left
Rotate Camera Right
Rotate Camera Up
Rotate Camera Down
Turn Camera 90° Right
Turn Camera 90° Left
ARFX Utility Functions
.png "image(112).png")
Toggle Rotation method: Switch between rotating at the screen to rotating at the camera’s position
Toggle Move Method: Switch between free XYZ movement and locked XY movement
Toggle Snap Controls: Toggles snap controls on/off
Toggle Camera Pitch and Roll: Set camera rotation and roll to 0
ARF Pro Camera Multifunction Inputs
.png "image(109).png")
Dpad Up Toggles/reset rotation, snap up/forward: Toggle Rotation, (Held) Reset Pitch/Roll, snap vertically up, (Held) Snap Forward
Dpad Down Toggles move method/focus input, snap down/back: Toggle Move Method, (Held) Toggle Focus Input, Snap Vertically Down, (Held) Snap Backward
Dpad Left Creates bookmark, snap/focus left: Create Bookmark, Snap Horizontally Left, Focal Distance Back (-1)
Dpad Right Navigates to next bookmark, snap/focus right: Next Bookmark, Snap Horizontally Right, Focal Distance(+1)
Key Up Adjusts pitch/focus, snap up: Pitch Up, Focus Up, Snap Up, (Held) Snap Forward
ARFX Bookmarks
.png "image(105).png")
Create Bookmark: Creates a bookmark only while in play in the editor. (Does not work in standalone)
Next Bookmark: Travels to next bookmark
Previous Bookmark: Travels to previous bookmark
Action Keys
.png "image(104).png")
Action 1: Activates action 1 in scene (if any)
Action 2: Activates action 2 in scene (if any)
Action 3: Activates action 3 in scene (if any)
Action 4: Activates action 3 in scene (if any)
Action 5: Activates action 5 in scene (if any)
Load Maps
.png "image(113).png")
Load Map 1: Loads the map 1 (if any)
Load Map 2: Loads the map 2 (if any)
Load Map 3: Loads the map 3 (if any)
Load Map 4: Loads the map 4 (if any)
Load Map 5: Loads the map 5 (if any)
Load Map 6: Loads the map 6 (if any)
Load Map 7: Loads the map 7 (if any)
Load Map 8: Loads the map 8 (if any)
Load Map 9: Loads the map 9 (if any)
Section 16.6 Graphics
Global Settings
.png "image(436).png")
Quality Preset: Adjust the quality of all graphics & textures settings.
This is a growing list of diverse options related solely to optimizing Unreal Engines’ graphical fidelity.
The Graphics menu are settings that have a direct effect on the graphical fidelity of your scene. It is also the one place to go in that will influence how well your scene will run on your particular machine. By default, ARwall’s built scenes will run as high a fidelity as possible, regardless of hardware. By changing your settings here, you can see in real-time the effect each setting will have both on your frame rate and the fidelity of your scene.
Notes for those in Unreal Editor
It is highly recommended that you use the editor’s Scalability options instead of this menu as the editor will simply override and lock down the settings that the option menu relies on. The greyed-out options in the will also indicate where you can go to do this.
To access the editor’s Scalability Options go to Settings (top right of the editor) > Engine Scalability Options
.png "image(437).png")
Settings To Change First for Performance
The following settings have the most impact on performance. You will have to compromise on graphical fidelity no matter what you choose.
Temporal Resolution Scale - This uses Unreal’s TSR to allow you to up or down sample the internal resolution of the rendered scene. To gain a great amount of performance, try down-sampling the image to 60-70%. If your output resolution is 4K or higher, you can go down even further to 40-50% (effectively rendering at 2K or 1440p and outputting to your final 4k and beyond). The lower you go, the softer the image will look. Requires Anti-Aliasing set to Temporal Super-Resolution
Post-Process Quality - This adjusts the quality of post process effects like that of overall lighting, color grading, and more. Lowering this to High or Medium will yield higher frame rates at usually little to no visual impact.
Shadow Quality - Adjusts the quality of calculated shadows, especially when using Unreal’s Lumen. Setting this to Medium will usually net a lot of performance if your scene is dependent on many real-time shadows. The cost to fidelity is also dependent on your scene.
Lumen Global Illumination - We list it here as it can increase performance but significantly decrease fidelity in one option. Depending on your scene, this could either drastically help you or cause the scene backdrop to suffer immensely.
Lumen Reflection Setting - In particular, Reflection Method, can greatly improve performance depending on if your scene has many reflections that are not the focus of your scene. Switching to Screen Space Reflections (SSR) will increase your performance at the cost of reflections that are not true to its surrounding environment. There is also the problem that SSR cannot reflect anything that is off screen, resulting in a fade away of reflections depending on angle.
Display Settings
Temporal Resolution Scale: Adjust the sharpness of the game graphics. When it’s too low, the items could show in a blurry.
Display Mode: Select the display mode
Resolution: Select the display resolution
Gamma: Adjust gamma calibration
V-Sync: Vertical synchronization prevents screen tearing
Max FPS: Select max FPS
.png "image(100).png")
HDR Settings
HDR: Enables output of high Dynamic Range(HDR) to take advantage of higher contrast and wider color gamut. This requires that you enable HDR in windows.
Display Nits: Enable HDR to edit this setting.
A Note on HDR (High Dynamic Range)
Enabling this option requires a restart of the application and that the scene runs in exclusive fullscreen mode. Also Note that most designers do not work with HDR in mind, so elevated black levels may be an issue.
.png "image(102).png")
Texture Settings
Anisotropic Filtering: Reducing blur and preserving detail at extreme viewing angles.
Texture Quality: Adjust Quality of the textures
Texture Pool Size: Allocates the specified amount of VRAM for texture streaming. This can fix blurry textured in specific scenes. Do not exceed the amount physically available on your GPU
.png "image(103).png")
Graphic Quality Settings
.png "image(96).png")
Post-Processing Quality: Adjust the quality of post-processing effects.
Anti-Aliasing Method: Choose the method of Anti-Aliasing(AA) to use or turn it off completely. FXAA is a fast but blurry. TAA has slightly better visuals for litter impact. MSAA gives better lines but is very expensive at higher resolution. TSR is an upsampling technique that is suprisingly perfomant and clean.
Anti-Aliasing Quality: Adjust the quality of AA, smooths the objects’ graphics. It is recommended to turn this on.
Shadow Quality: Adjust the quality of shadows for characters and objects.
Effects Quality: Adjust the quality of various effects like reflections and material fidelity. (Can take a moment)
Detail Quality: Adjust the minimum detail level for actor to render
Foliage Quality: Adjust the quality of Foliage
View Distance Quality: Adjust the visible distance. objects will be hidden based on their distance to the player.
Motion Blur Quality: Adjust the blur quality on fast-moving objects
Lumen Global Illumination
.png "image(97).png")
Lumen Global Illumination: Select whether to use a lumen for ray-traced global illumination or to fall to baked lighting(if any). Has a moderate GPU and CPU cost and greatly affects visual quality.
Scene Lighting Quality: Larger scales cause Lumen Scene to be calculated with higher fidelity, which can be visible in reflections, but with a higher GPU cost.
Scene Lighting Detail: Controls the size of instances that can be represented in Lumen Scene. Larger values ensure small objects are represented, but increase GPU cost.
Scene Lighting View Distance: Sets the maximum view distance of the scene that Lumen maintains for ray tracing against. Larger values increase the effective range of sky shadowing and global illumination but increase GPU cost.
Final Gather Quality: Increases the quality of lumen global illumination and reduces noise being rendered, but increases the GPU cost of rendering it.
Max Trace Distance: Controls the maximum distance that Lumen should trace while solving lighting. Values that are too small cause lighting to leak into large areas, such as caves. Large values increase the GPU cost to render the scene.
Capture Resolution Scale: Scalar that controls the resolution of the shadow and highlight resolutions. Smaller values save GPU memory , at a cost in quality.
Lumen Reflection Settings
.png "image(98).png")
Reflection Method: Select whether to use Lumen Ray Traced Reflections, Screen Space Reflections (SSR), or None at all. Lumen has a heavy GPU load depending on the amount in the scene. SSR is performant, but is inaccurate and only renders what’s on screen.
Reflection Quality: Increases the quality of Lument Reflections on surfaces, and reduces noise being rendered, but increases the GPU COST of rendering them.
Translucency Reflections: Determines how to handle mirror reflections infront of translucent surfaces. Other layers. Increases GPU cost when set High.
Reflection Bounces: Sets the maximum number of recursive reflection bounces. 1 means a single reflection ray (no secondary reflections in mirrors). Only supported by GPUs with hardware ray tracing. Has a significant GPU cost with each additional bounce.
Section 6.6 User Interface
User Interface
The User Interface section has a list of settings that affect the Options menu as a whole. With this you can scale the menu to better fit your needs, make the menu completely transparent, or even disable the menu’s frame rate widget.
.png "image(438).png")
Options Menu Scale: Change user interface scale
Background Opacity: Sets the opacity of the tinting used over the rendered scene for the options menu.
Background Black Opacity: Sets the opacity of the black background that can be applied over the rendered scene below the options menu.
Background Blur: Affects the strength of the blur used over the rendered scene below the options menu.
Options Menu FPS: Toggle for this menu’s FPS and frame time display at the top right.
Section 6.7 History
Current Changes
This page allows you to manage the history of changes you have made within your ARFX environment. It provides options for viewing Current Changes and tracking the Change History. Additionally, you can clear the history of modifications made or delete all settings to revert the environment back to its default state.
.png "image(439).png")
The history section houses a list of changes made throughout your use of the options menu. It is also your place to reset everything that has been saved by the ARFX Camera. Do know that any changes made here cannot be reverted.
Important
Though this menu captures every save you’ve made, the menu is only set to revert changes to the Color Lab. The reason for this is that Setup, Controls, and Graphics all have settings that peculiar to the operation of your scene. We do not want to revert these important settings."
Section 6.8 Resume
This option closes the Options menu and returns you to the scene currently in play.
.png "image(75).png")
Section 6.9 Save
Save
Here, you can save all the changes you have made in your settings.
.png "image(72).png")
Log Out and Quit to Desktop - This options quits the scene and returns you back to the desktop
.png "image(77).png")
Was this article helpful?